 Hi, I'm Heidi and I homeschool my two sweet kids. I want them to know that learning is an exciting lifelong adventure! We love great books, unit studies, notebooking, lapbooking, and hands-on learning.
Making Pysanky(ish) Eggs With Kids
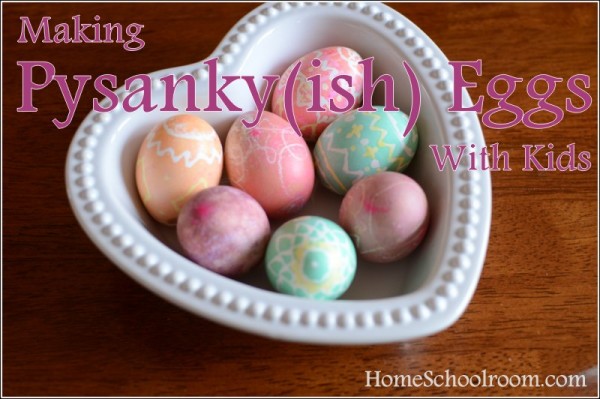
Like most children, mine love the yearly tradition of dying Easter eggs. Since being inspired a couple years ago by the beautiful Pysanky eggs made by Babushka in the book Rechenka’s Eggs we wanted to step up our decorating methods. Luckily I found methods that are child-friendly and don’t require special equipment.
We’ve used two different techniques: one is a bit easier and suited to younger children, and the other is more precise, takes longer, and is better suited to older children (or moms!) who enjoy the more detail-oriented process.
I’ll explain the steps for the more difficult process…stay tuned to the end for how to simplify for younger children.
A Child-Friendly Pysanky Egg Using Melted Wax
This technique uses melted wax as a dye resist, much like traditional Pysanky.
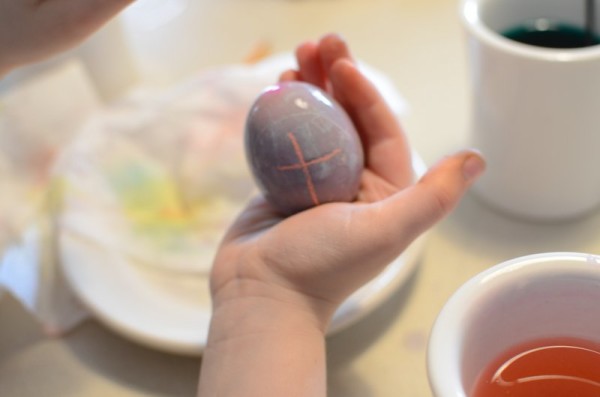
1. Melt wax to use as a resist for the dye. I used a tea light wax melter to melt another tea light with the wick and metal case removed.
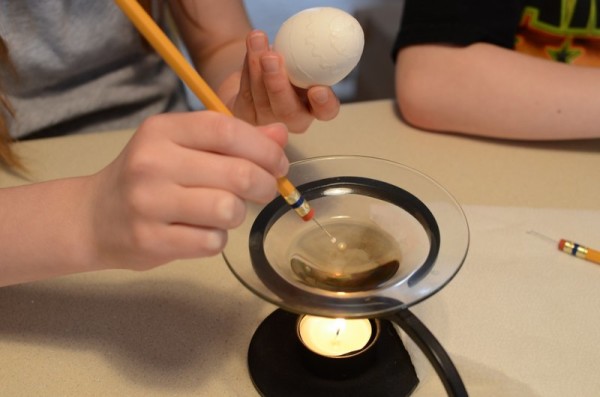
2. After the wax melts use a tool to apply wax to the egg. We made our own tools by sticking a sewing pin into a pencil eraser. Applying the wax this way is a slow process requiring frequent dipping of the tool into the wax. Starting with a plain egg, wherever you add wax will remain white.
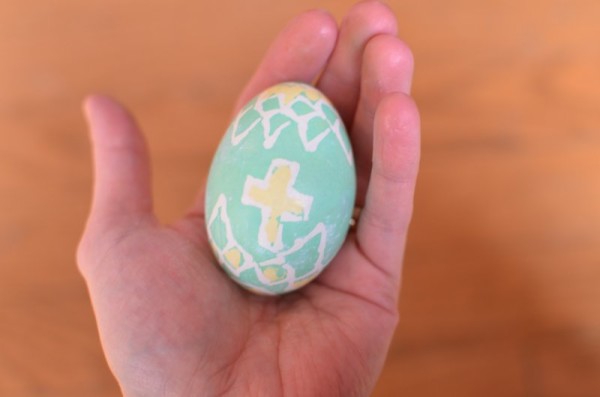
3. Dye the egg, taking care to start with lighter colors. In this case my daughter started with yellow.
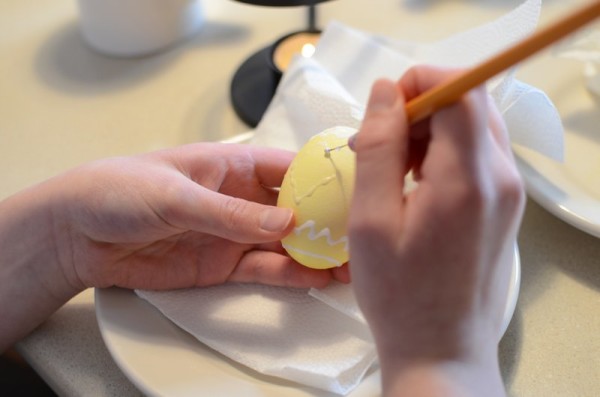
4. Add more wax before dying again. This time the wax will protect the lighter dye from being covered over with darker colors. You can repeat the process of applying wax then dying a few times, moving from lighter to darker colors.
5. When finished remove the wax. It’s a tricky process involving an open flame, so I did this part for my children. I warmed the egg over the flame, being careful not to burn myself or make a burnt spot on the egg, then wiped with a paper towel.
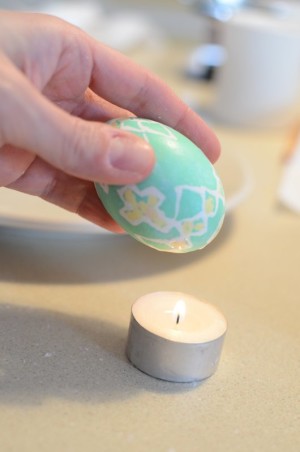
At the end you have a beautiful egg with layers of color and pattern, reminiscent of the beautiful Pysanky eggs!
Simplified Version using a Wax Crayon
This technique is perfect for younger children because it is not much more complicated than dipping in one color and does not involve hot wax. Simply use a white wax crayon (they come with many egg dye kits) to draw patterns on the egg. The wax crayon will protect areas from accepting dye just like the melted wax.
Be sure your child presses down carefully with the crayon to apply a thick layer of wax. Obviously you can’t get the fine details with the crayon, but it still allows for creativity and layers of color.
Removing the wax is easier: just wipe down the egg with a paper towel.
In addition to being very proud of our finished eggs, I appreciate how these techniques encourage my children to slow down and focus on the process. Each year we look forward to a relaxing afternoon during the Easter season making just a few eggs, instead of dying a dozen without particular attention to an individual egg.
How I Teach Homeschool Fine Arts
This is the final installment in the “How I Teach” series, where I’ve been sharing how I approach each subject area. It’s time for the finishing touches: fine arts.
What do I try to cover in fine arts?
This is where I bring in the beauty, all that is lovely in classical music and art, theater and dance. I’m interested in two things: appreciation of beauty through experience and education, and also opportunities to produce beauty.
Why are fine arts necessary?
Why bother with fine arts? Aren’t they just frosting? Well, one of my favorite homeschool authors says it better than I can:
Great paintings, like great music, are part of our common culture. They are part of the core that educated people enjoy and share and through which we all gain deeper understanding of human possibilities in this world…What we want is for the children to use their minds in a kind of thinking that they don’t experience while practicing subtraction or learning the past tense of verbs…Study more than the tyrants and wars of the past. Enjoy the best of civilization. Enjoy music and art.” Ruth Beechick in You Can Teach Your Child Successfully
How Do I Teach Homeschool Fine Arts?
I was initially nervous trying to cover fine arts because of my limited knowledge, but I’ve found great joy in learning alongside my children using simple techniques and a myriad of available resources.
*This post contains affiliate links to products I use and enjoy in our home.
- Both my children take private music lessons that include music theory. This one requires the highest financial sacrifice and time commitment, but also has the largest life-long benefit. My children both have developed a love for their instrument and enjoy playing for others, both informally in our home and at recitals and church.
- My eleven-year-old daughter recently joined the adult choir at our church, which is not only providing a lot of music educations, but a lasting relationship with the choir director, the delightful members of the choir, and the lovely songs they sing.
- This is our second year utilizing Harmony Fine Arts, an art and music appreciation curriculum created by Barb, a homeschool mom who just graduated her third child. Her materials have been instrumental in our fine arts education: she provides a fabulous framework to help me know what to introduce, leads me to wonderful resources (like The Story of the Orchestra), and provides instruction in methods that are simple and enriching, like picture study. And here’s a great tip I learned from her: discounted calendars are an inexpensive way to obtain large full-color prints by famous artists. I just picked up a Monet calendar for $3 at an art museum!
- Another homeschool-mom-created curriculum that I love using is SQUILT by Mary from Homegrown Learners. The Super Quiet Uninterrupted Listening Technique helps your children form a personal relationship with great classical music, and Mary provides the background information to allow you to have educated discussions with your children about what they hear.
- Two other easy to use resources are Maestro Classics CDs (I bought Peter and the Wolf for Christmas), and listening to Classics for Kids, an excellent radio show (you can listen online or as a podcast) that teaches children about composers and pieces of music.
- We go to experience fine arts when possible. We’ve enjoyed wonderful opportunities: Shakespeare’s Twelfth Night, a production of The Nutcracker with full orchestra, the musical Annie, an on-stage radio theater presentation of A Christmas Carol, art museums, etc. This can also become expensive so I watch for discounted tickets. I also use quality DVD recordings, like we did for CATS, to bring the productions to us.
- To produce art I use resources like Storybook Art, keep supplies on hand and allow my children free use of them, and use ideas from my Art and Artist Study Pinterest board for learning about great artists and producing our own art. We also enjoy participating in Sketch Tuesday at Harmony Fine Arts. Email your sketches on that week’s theme, and then enjoy a slideshow of everyone’s drawings.
- We’ve begun studying hymns using the book Then Sings my Soul: 150 of the World’s Greatest Hymn Stories. It’s simple: I read the story of the hymn from the book and find a YouTube video with the words displayed on the screen. We listen regularly and try to sing along until we’ve learned it.
I hope this in-depth look into how I teach each of the subjects has been helpful. I love learning alongside my children and finding the methods that work for all of us to enjoy the journey of education.
The “How I Teach” Series:
- Our Family and Philosophy
- How I Teach Language Arts
- How I Teach Math
- How I Teach Science
- How I Teach History
- How I Teach Fine Arts
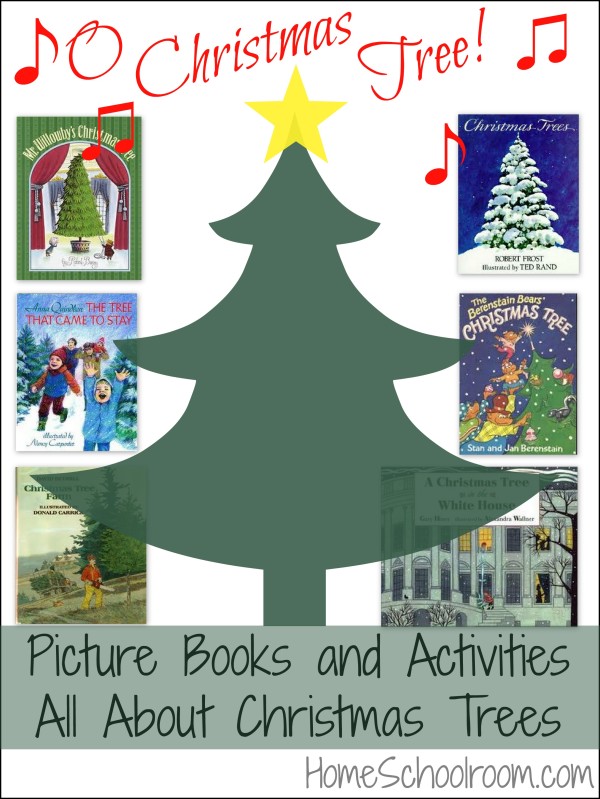
Christmas Tree Picture Books and Activities
Christmas trees are one of my favorite Christmas decorations. I love sitting in our living room lit only by the twinkling tree lights, reminiscing over Christmases past, recounting the memories in our ornaments, and admiring the pattern of the lights shining through branches onto the ceiling.
We have a collection of beloved Christmas picture books that we revisit like old friends. Just for fun I’m here to share with you our favorite picture books about Christmas trees and activities that pair nicely with the theme–everything from crafts and nature study to poetry and music!
Picture Books About Christmas Trees
Mr. Willowby’s Christmas Tree by Robert Barry: We love this heartwarming story! Wealthy Mr. Willowby has a fine tall tree delivered, but has to cut off the top to fit in his room. The tip of the tree passes down through families (human and animal) to be the center of many celebrations.
Christmas Tree Farm by David Budbill: This is a great living book that tells the story of a man’s work on a Christmas tree farm. Lovely illustrations depict the mountain scenery and the year long job of planting, tending and pruning trees that will grace our living rooms. It’s no longer in print, so check your library or look for another book that tells children about their tree’s life before it came home with you.
The Tree That Came to Stay by Anna Quindlen: This is a sweet story of simple family traditions centered around the tree. I can relate to the sadness of saying goodbye to the tree that shared your Christmas celebrations. In this book they keep a basket of needles from the tree to keep a little part of their tree and the smell of Christmas.
A Christmas Tree in the White House by Gary Hines: This picture book is based on true events during Theodore Roosevelt’s time in the White House. I enjoy stories that let our children learn about past presidents as real people.
The Berenstain Bears’ Christmas Tree by Stan and Jan Berenstain: I am a Berenstain Bears fan, and this story complete with rhyming text doesn’t disappoint. Papa Bear is up to his normal antics as he searches for the perfect Christmas tree, meeting up with misfortunes along the way. As a family that trudges through a tree farm to find our “perfect” tree this story has us laughing, and the tender ending reminds us to think of all God’s creatures during the holiday.
Christmas Trees by Robert Frost and Illustrated by Ted Rand: This poem by Frost was made into a beautifully illustrated picture book. It’s actually alive with the colors of fall on a farm and shows a city man coming to buy Christmas trees from a country farmer. If you know much about Frost you can probably guess that the country life is depicted as preferable.
Christmas Tree Activities
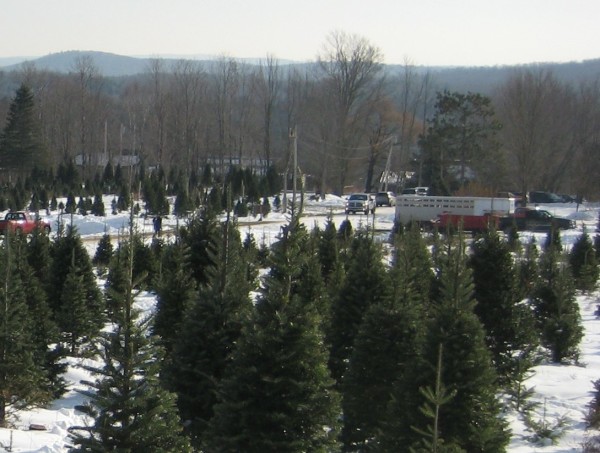
Visit a Christmas Tree farm: If you usually use an artificial tree or buy one from a pre-cut tree lot, try to visit a Christmas tree farm. It’s a treasured tradition in my family to make the trek to the tree farm and wander about the field to choose and cut our own tree. We’ve visited the same tree farm for years. It doesn’t hurt that they offer cider and donuts and a horse-drawn wagon ride!
Make scented sachets from your Christmas tree needles: I love the idea of keeping a little bit of our Christmas tree all year long like in The Tree That Came to Stay. I think we’ll try it this year with scraps of fabric machine or hand sewn into little sachets to tuck into closets and drawers.
Make an ornament for your tree shaped like…a Christmas Tree! The options are endless so you can find one for any age and crafting ability.
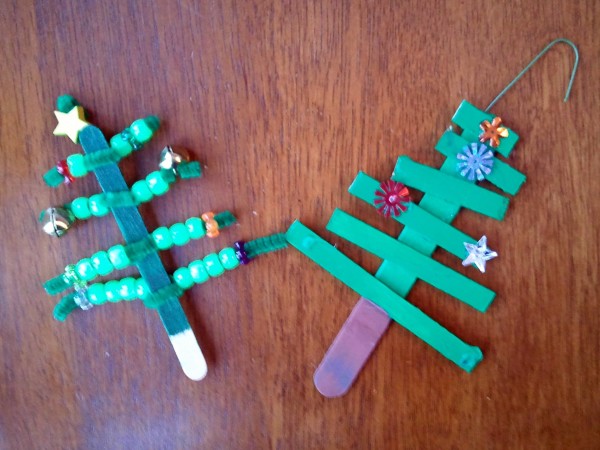
- Pipe Cleaner Christmas Tree: Just paint (or use a marker) to color the craft stick green or brown to make a tree trunk, then wrap green pipe cleaners around your trunk. After that provide an assortment of beads to decorate.
- Craft Stick Christmas Tree: The other tree is also easy and involves gluing craft sticks together to make a tree shape. I recommend using a large craft stick for the trunk and smaller ones for branches. I like using hot glue because it dries quickly, but white glue would be fine if you allow it time to dry. Paint the sticks brown and green and then glue on sequins or buttons or whatever for decorations.
- We’ll be stepping it up this year and sewing this fabric Christmas Tree ornament. I can’t wait to see what mix and match fabrics my kids pick out of our fabric stash!
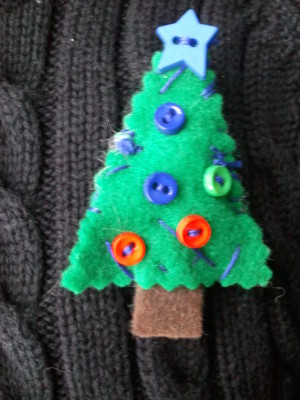
Make a felt Christmas Tree Pin: We started with the idea here, and just added our own touch by decorating it with button ornaments and a star and embroidery floss garland. These were really fun to make, and we just used inexpensive craft felt–though the wool felt would be nice. The photo is one my son made when he was 6. By the way, these make adorable gifts for grandmas or anyone else who would treasure a handmade item from a child they love.
Decorate a tree outside for the birds (and squirrels–we can’t forget Nutty our squirrel friend!): We’ll try some ideas from Wild Birds Unlimited to make some Christmas treats for our feathered and furry friends. On the right hand side of their webpage is a link to download a brochure with recipes.
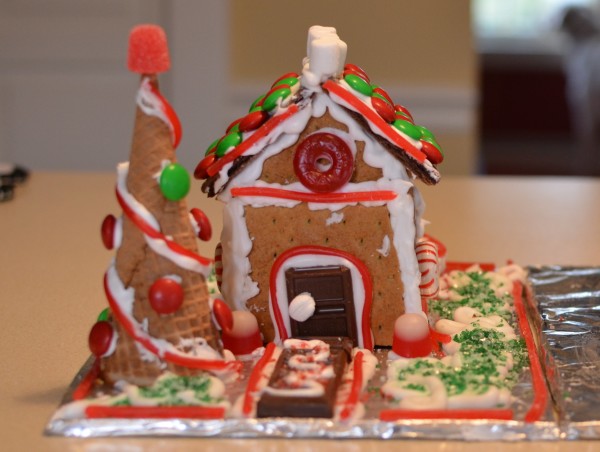
Make edible Christmas trees from sugar cones like these ones from Erica at Confessions of a Homeschooler. I’ve done this with groups of kids at Girl Scouts and kids at my home to add to our gingerbread house decorations.
Incorporate a little nature study: What better time to study trees than when you have a large specimen in the middle of your living room! If you don’t already know the variety you can find out using the Arbor Day website. Here you can see a list of the top ten Christmas tree varieties with links to learn more about them.
Include some music appreciation: How about studying the Christmas Carol “O Christmas Tree” to incorporate a little music? I hadn’t realized how many versions there were until I searched when writing this blog post. You can read a little more about the carol on Wikipedia and listen to whatever version you have in your holiday music at home.
Learn about the history of Christmas Trees: When did people start bringing a tree into their homes and decking it with lights and ornaments? The History Channel offers a lengthy article and many videos discussing the history of the center of our holiday decorating.
If you’re like us and put aside the regular curriculum to savor this special time of year, visit my Pinterest page for more Christmas activities to do with your kids.
You’ll also find more ideas as part of iHomeschool Network’s roundup of winter and Christmas “A Book and a Big Idea” posts!
Trying a Trio of Pinterest Projects
Pinterest is a very helpful tool and has replaced my browser’s bookmarks as a way to save projects for later. The photos make it so much easier to scan through my links. We thought it would be fun to have a little Pinterest Challenge at iHomeschool Network to encourage us to complete some of those pretty pins.
Here are three projects I gave a whirl: one complete success, one that required a little tweaking to be successful, and then one that hasn’t succeeded fully–but I’m not giving up!
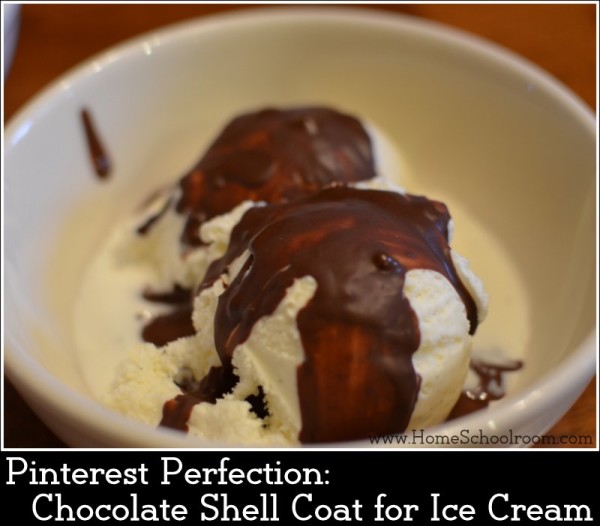
Project #1: An utterly delicious ice cream topping.
Have you ever ordered a chocolate dip cone at an ice cream shop or used homemade shell topping from the grocery store? Well, Family Fun hasan easy recipe for a homemade version that is not only scrumptious, but easy and made with items I keep on hand. Homeschoolers can point out the science, too: how our coconut oil is liquid at high temperatures but solid when cool, so mixing that with chocolate helps give us that thin coat that hardens on contact with ice cream.
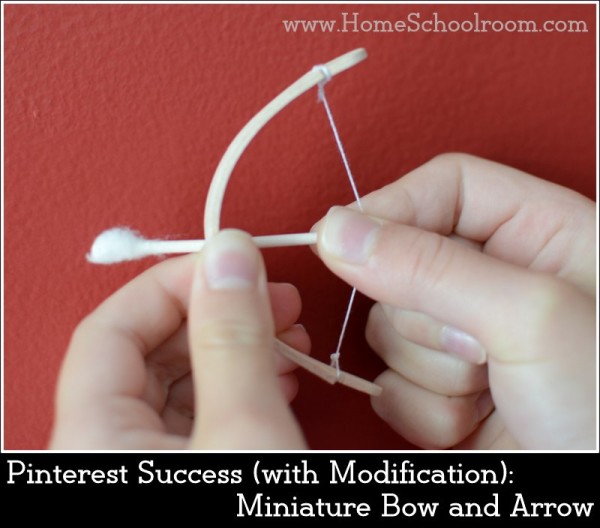
Project #2: Mini Bow and Arrow Craft
My son has been wanting to make this miniature bow and arrow for months, so this challenge prompted us to give it a try. Following the directions exactly our first attempt was fun but needed some tweaks to really work well.
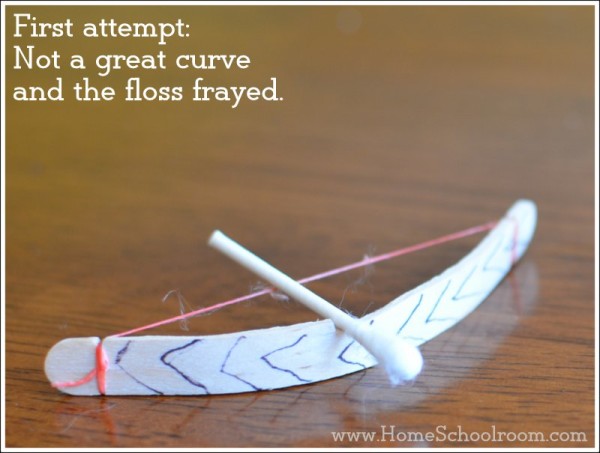
We didn’t get a great bend in our popsicle stick–it was hard to hold the tension on the curve of the wet stick while tying floss. Also the floss was not durable–it stretched over time (losing even more of the bend in our stick) and began fraying with use. Maybe I buy cheap floss? The coating also made their fingers sticky and scented.
I remembered another pin I have for making bracelets from popsicle sticks, so I used the directions there. You soak the sticks, put them inside a glass to form the arch, and allow them to dry there.

This gave us a beautiful bow that kept its shape (even now, a couple weeks later). My second tweak was to skip the fraying floss and use a stronger string. In our case I used craft thread. This made a more durable bow and led to quite a bit of fun with target practice and experimenting for the kids.
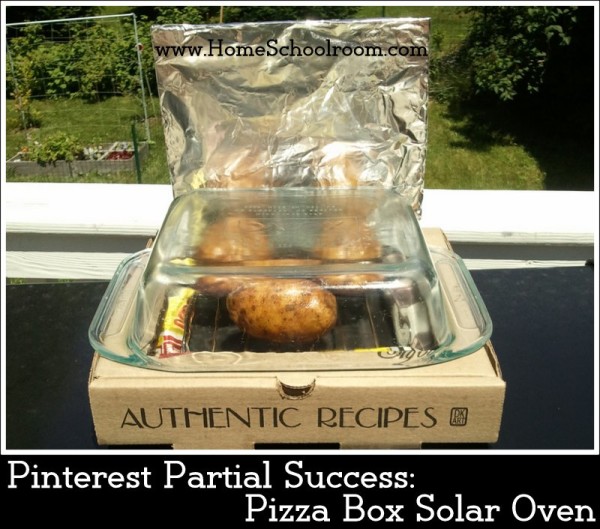
Project #3: Pizza Box Solar Oven
I’ve been wanting to try a solar oven forever! I used instructions from Home Science Tools; they even have a PDF with recipes to try. I followed the instructions as closely as I could. I built up quite a bit of heat (175 degrees was the highest) and my potato was hot, but not fully cooked.
I see a couple reasons for my failure:
- I chose a tricky food for my first try, I think–a baked potato. Unlike hot dogs or s’mores that many solar oven recipes prepare, you need some serious heat over a long period of time to bake a potato. But hey, I’m never one to take the easy way out.
- I had a couple small openings behind the glass pan that allowed heat to escape. Plan: Block any place air can exit!
- I had three potatoes, which created a lot of thermal mass for a small oven to heat. This site has wonderful information about the science and history behind solar ovens. I’ll try with one potato next time.
- I didn’t have enough time–I started around noon and then didn’t check on it the last hour so it ended up being in full shade when I checked at 5 o’clock. I lost valuable cooking time! Next time I’ll start earlier and remember to check frequently.
Like I said, I’m not giving up yet! In fact, I love that this didn’t work the first try. It gives me a chance to model for my kids “If at first you don’t succeed, try, try again.” They were very skeptical so now I’m determined to show them that we can bake a potato using power from the sun!
If you’re looking for more ideas for your homeschool or fun with your kids, visit my Pinterest boards. Do you like using Pinterest to organize ideas? And do you often get a chance to go back and actually do those wonderful activities?
Pop over to iHomeschool Network to visit other bloggers who tried out some of the projects sitting on their Pinterest boards.

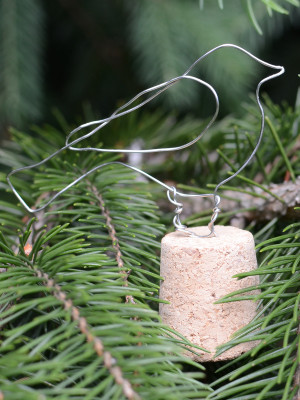
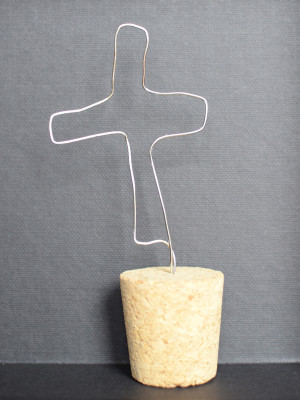
Sculpting Wire Like Norman the Doorman

We love the sweet story of Norman the Doorman by Don Freeman. Norman is a hardworking doorman in the basement of a museum. When he isn’t guiding mice through the artistic treasures he pursues his hobby: trying to “create something pleasing or beautiful.” Wouldn’t that be a great pastime for us all?
During the story Norman creates a wire sculpture and enters it into a sculpture contest at the museum. Inspired by Norman’s creation we tried our hand at wire sculpting. I had been wanting to try this with my kids ever since I saw the “Drawing with Wire” article in Family Fun Magazine last year.
For supplies you simply need:
- paper and pencils for sketching your ideas
- wire: you can find it in most craft stores, often in the jewelry section (ours was 20 gauge)
- wire cutters
- something to hold your wire creation like cork or modeling clay, or you can hang your finished product
- safety glasses would have been a good idea (but I forgot)
- needle nose pliers can come in handy, but aren’t necessary
On a way-too-hot-to-be-outside summer afternoon we reread Norman’s story, then gathered at the table to create. We found out it wasn’t as easy as we first thought and why Norman worked “all through the day and far into the night.”
Family Fun’s suggestion of sketching on paper without lifting your pencil helped get our ideas flowing.
We twisted and bent the wire until we felt we had created something pleasing. The wire was very forgiving–if we didn’t like our shape at first, we just tried again! Leave some wire free for mounting unless you plan to hang your sculpture.
To finish we used a large pushpin to make a hole in the cork before sticking in the free end of the wire. We didn’t find it necessary to mount our corks to a board like the article, they stood just fine on their own.
Norman says “all pieces must have titles” so it was time to name our creations.
My daughter created “Tribute to Treble.”
My creation is “Bird in Wire.”
My son’s creation is “The Cross of Jesus.”
It was fun to create something beautiful and we’re very pleased with our results!
This post is part of a fun iHomeschool Network Blog Hop where we’re all sharing A Book and a Big Idea. I know I’ll be looking for more ideas to fill those too-hot or rainy summer days!
10 Crafts to Encourage Creativity in Kids
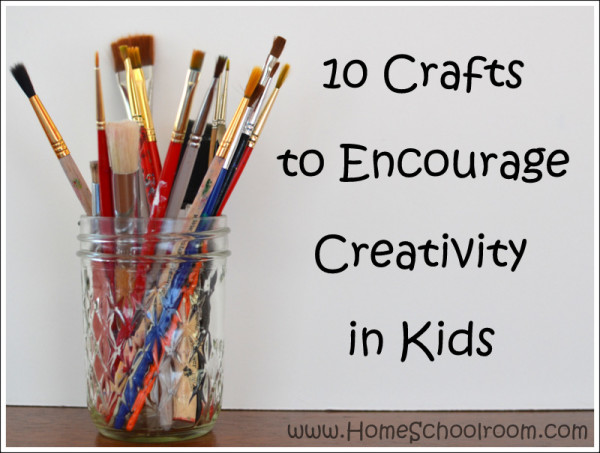
The topic for this week’s iHomeschool Network Top Ten Tuesday is toys! Why am I talking about crafts, you ask? Well, my children are by no means short on toys but I hate the clutter and single-purpose types of toys that fill the shelves these days. Toys that support open-ended play like Legos and puppets are the only toys I don’t try to sneak into the yard sale pile. Something I love to see my children use their free time for is creating something.
I have always enjoyed crafting, so I’ve kept a craft cupboard stocked with supplies my kids can use since they were preschoolers. I don’t like to have them always following my (or someone else’s) exact directions to arrive at a prescribed end product, but I’ve found that when introducing craft supplies it helps if we work together at first, or I provide a book or video with instructions for their first project or two. Once they get their feet wet they’re ready to branch out on their own and create to their heart’s content.
Here’s my list of 10 types of craft supplies to keep on hand for creative inspiration:
#1 Drawing Supplies
Drawing may be the simplest craft, but having some extra supplies on hand makes it a little more interesting. I stock mechanical pencils, colored pencils and fun drawing tools like actual drawing pencils that make shading easier, pens of different thicknesses for line drawings, and gel pens for fun. Invest in some how-to-draw books for instruction and inspiration. What is nice is that you can find how-to books for just about any interest your child has (for my son it was military vehicles). Chalk pastels are as simple to use as crayons with a lot more ability to mix and blend. Tricia at Hodgepodge posts wonderful pastel lessons to get you started.
#2 Painting Supplies
Each of my children uses one of Daddy’s old shirts as a smock and I stock various types of paints:
- Watercolor: Tray and liquid watercolors are both fun. With watercolor pencils your child can use them like regular colored pencils then use a wet brush to blend. With any watercolors it’s best to use a heavier-weight paper. Sometimes we just use white cardstock, but other times we break out the real watercolor paper. (Kids love using grown-up supplies.) Klutz has a nice beginner watercolor book that teaches some beginning strokes.
- Tempera: I buy the washable kind and it’s great for thick coverage on paper.
- Acrylic: I stock up on different colors when they’re on sale. We use acrylic if we’re painting on something other than paper: wood, cardboard, rocks, you name it!
- Don’t forget specialty paints: We’ve made great gifts for grandparents out of plain mugs, coasters, place mats and tote bags using glass/ceramic, metal and fabric paints.
#3 Sculpting Supplies
Don’t let the fancy term frighten you, there are many options to try that aren’t difficult. First off there is gold old homemade playdough. I’ve shared our personal favorite recipe before, and I must say my son still plays with it most days. He reenacts battle scenes from our history studies or runs trials with his creations (he’s a big fan of Mythbusters right now).
If your children want to keep their creations there are two great options:
- Air Dry Clay: We’ve used air dry clay during history studies to make candle holders. It’s easy to mold and you simply leave it out to dry. After drying it can be painted.
- Sculpey Polymer Clay: This is one of our all-time favorite craft supplies. It comes in loads of colors (or buy white and paint it after it’s baked). It’s a little difficult to soften when you first start, but using a little muscle it’s easy to sculpt. After the creation is finished you bake it in the oven to harden it. My daughter uses Sculpey to make food and accessories for her Victorian doll house.
#4 Duct Tape Crafting
Just about every kid enjoys crafting with duct tape. As an independent craft your kids should be a little older because you have to use a sharp knife to cut the tape. We use a self-healing fabric cutting mat as a work surface. The book Tape It and Make It helped my daughter with basic construction skills and some cute projects to get started.
#5 Stamping Supplies
My son doesn’t always enjoy drawing so stamping is one of his favorites. From his own rubber stamps of vehicles and bugs, to sets I’ve bought with letters and holiday images, he has fun using them to make pictures and cards for people. I buy washable stamp pads for using with rubber stamps and it’s also fun to use them with your fingers like Ed Emberly to make pictures.
#6 Card Making Supplies
I purchase packs of blank cards and envelopes at the craft store. (I use a coupon or wait for them to be on sale then buy a pack of 25 or 50.) I keep lots of supplies on hand for decorating: fancy edge scissors, paper punches (the that work almost like scissors are easiest for their hands), colored card stock, and of course they can use our other supplies like paints, gel pens, and rubber stamps to decorate them. I lay out the supplies after Christmas and birthdays and have them create their own thank you cards.
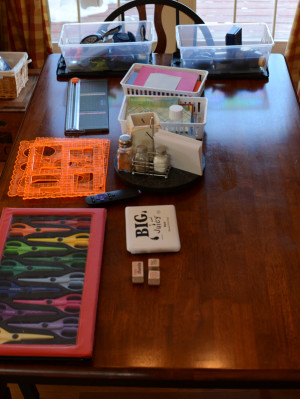
#7 Recyclables!
In our basement I keep a large cardboard box where I throw things that would normally go in our recycling that my kids are free to use any way they wish. Egg cartons, oatmeal canisters, orange crates, glass jars, bottle caps, shoe boxes, cardboard tubes (I prefer ones stronger than paper towel tubes–like the ones from plastic wrap and aluminum foil), and any other odds and ends that look promising. They build all sorts of things and I don’t have to worry about overseeing what supplies are being used.
#8 Sewing Supplies
Don’t be turned off just because you don’t sew! I have two easy recommendations to get you started.
- One is a superb book called Sewing School. It is filled with wonderfully easy to understand instructions that will help your child with the very basics (like threading a needle and the simplest stitch) and includes instructions for kid-friendly sewing projects with patterns included in a pocket in the back.
- The other tip I have is to keep sheets of craft felt on hand. You can buy sheets of craft felt very cheaply, it comes in a rainbow of colors, and it’s great for beginning sewers. I keep a bin of it that the kids can cut shapes out of and sew together using craft thread and a large needle. They make little creatures, blankets and pillows for dolls and stuffed animals, and anything else they can think of. Because it’s inexpensive they’re free to try to make things (even if the project doesn’t work out) and they don’t have to worry about the edges fraying like fabric.
#9 Odds and Ends
This is my category for all those random supplies you can pick up and wonder what they could be used for–but don’t worry, your kids will make them into something! Keep your eye out for inexpensive bags of popsicle sticks, googly eyes, pipe cleaners, yarn, old-fashioned style wooden clothespins, feathers, and pom poms.
#10 All-in-One Craft Kits
All-in-one kits are great to have on hand (and give as gifts). We’re big Klutz fans and my kids have enjoyed projects like paper airplanes, friendship bracelets, Twirled Paper (Quilling), and Twisted Critters (Pipe Cleaner Animals). These kits are especially great for craft-challenged households because they’re really designed for the kids to do on their own and come with all necessary supplies.
I hope I’ve persuaded you to stock your craft cupboard if you don’t already. Now is the perfect time so you can just point the way for a sure summer boredom buster! What do you keep on hand for those moments when the urge to create strikes your kids?
Hop over to iHomeschool network to see what toys make other blogger’s top ten lists.
{Every Tuesday for the next 10 weeks I’ll be participating in a blog hop of top ten lists.}
This blog hop series was inspired by Angie of Many Little Blessings where you’re welcome to link up, too!
A Collage of Busy Hands
Our week was filled with hands-on activities. I love incorporating busy hands in our schoolwork–activities that reinforce the learning or create useful or beautiful items are always appreciated. And this week nearly every subject had us making and doing.
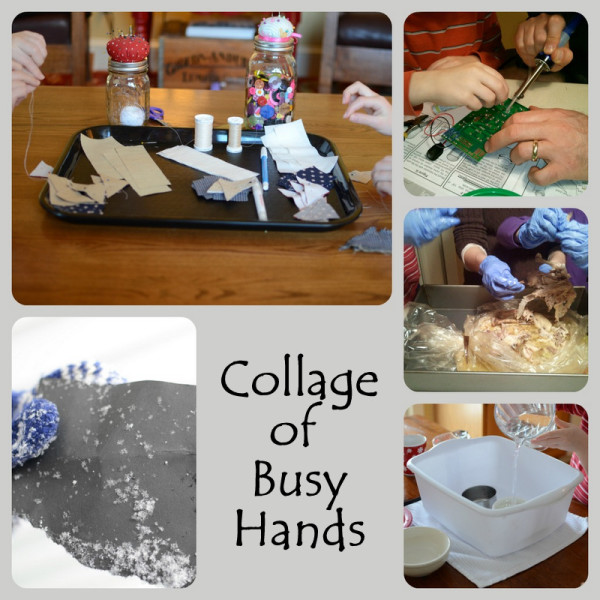
- Sewing a quilt square is a project from our Time Traveler’s unit on the 1800s. I adore doing crafts with my children that become keepsakes and this one fits the bill, along with showing them the work involved in the quilts that pioneer women made. We’re doing all the sewing by hand, just one or two squares at a time as I read aloud. They both enjoy it and are excited to see the pattern coming together.
- My husband and son (both quite electronically inclined and prone to gadget love) built an electronic kit to learn about soldering. This was their first foray into electronics together, they loved it and are working on another kit already. I have put in a request for a robot that cleans the house for me.
- We continued our bird studies by examining a chicken skeleton. Yes, it was our dinner. Yes, my husband gave me an odd look when I said we would bake a chicken for dinner so I could use the bones for schoolwork. Yes, my daughter thought it was gross–but then was fascinated by the experience. I’ll have a full post on our bird unit when we finish.
- More hands-on-math for my son: this time capacity estimation. I’ll also share more on that in a later post–just one note here: have towels handy.
- I’m preparing a snow unit study for a fun midwinter change. We’ll be doing it in two weeks and I had an activity in mind for the unit, but looked out Wednesday to see the perfect snowflakes falling. Reminding myself to be flexible we took advantage and spent time being amazed by nature and the seemingly simple but actually miraculous snowflake.
The neatness of our house suffered quite a bit along the way, but it was a good week. What are your favorite hands-on activities?
Thank you to the wonderful hostesses with fun link-ups on Fridays. Be sure to join the fun and see what other homeschoolers are up to!


Holiday Homeschooling: Counting Down the Days

Christmas is my favorite holiday, and not just the day but the whole season. Homeschooling provides the extra blessing of flexibility to enjoy all that this delightful time of year has to offer. Over the next couple weeks I’ll be sharing how we celebrate the holiday while homeschooling. Not in spite of homeschooling, but tying everything together.
Advent calendars are a great tool to savor the season. I use a wooden snowman with 25 drawers that I purchased at a craft store and painted. I fill each drawer with a small piece of candy and a slip of paper with an activity. Having our advent calendar has improved our celebration of the Christmas season:
- It gives my children a visual reminder of how many days before Christmas Day.
- The activities give them so much to enjoy throughout the season that they savor it, rather than just wanting it to be over so the big day arrives.
- Coming up with activities for the days assures that we enjoy the holiday season together and it won’t be December 22nd when I realize we haven’t done all that we wanted.
So, are you persuaded that you need an advent calendar? There are many options for the actual calendars: most stores sell fabric ones with pockets and wooden ones with drawers, and the Internet is loaded with ideas to make them from everything from paper bags to baby socks.
Are you thinking, “But how can I come up with TWENTY-FIVE activities?” Don’t fret! Trust me, it really isn’t that hard. If you sit down and write the things you enjoy doing during the holiday season you’ll probably be half way there anyway. The activities don’t need to be difficult or time-consuming. Are you going to visit friends or relatives to celebrate? What about scheduled events in your town, homeschool groups or church?
Still not convinced? Let me prove it:
- Make a paper chain to count down the days.
- Look at family Christmas photos (or videos) from previous years.
- Drive around looking at Christmas lights.
- Put up Christmas lights outside.
- Decorate our Christmas tree.
- Wrap Christmas gifts.
- Write a letter to Santa.
- Make paper snowflakes.
- Attend town tree lighting or parade.
- Have a candlelight (and tree lights) dinner at home and dress fancy.
- Visit friends to admire their decorations.
- Deliver homemade treats to friends and neighbors.
- Play games or put together a puzzle by the Christmas tree.
- Read the Christmas story in the Bible.
- Go out for dessert.
- Decorate gingerbread houses.
- Make place cards or place mats for Christmas dinner.
- Go caroling.
- Attend a Christmas concert or sing-a-long.
- Attend a holiday performance (check local theaters/schools for a holiday play or ballet).
- Have hot cocoa with only the tree lights on.
- Make Christmas cards.
- Visit Santa.
- Make cookies for Santa.
- Decorate a tree outside with food for the birds.
- Make a popcorn garland.
- Make a birthday cake for Jesus.
- Make handmade gifts.
- Walk around the neighborhood to enjoy Christmas lights.
- Participate in or watch a church Christmas pageant.
- Have a sleepover beside the Christmas tree.
- Attend a church Christmas Eve service.
- Watch a Christmas movie (many choices for all ages–I use this several times).
- Make a Christmas craft or ornament (I use this more than once, too).
- Bake a Christmas treat (I use this one a few times, too).
Now that is THIRTY-FIVE ideas, and I use a few of the ideas more than once! Are you convinced that this is actually easy? It doesn’t add hustle and bustle–it stretches and slows the season. And in case you think I’m super organized, I don’t actually fill all the drawers ahead of time. I have my list and supplies ready but I schedule specific activities a few days at a time (or the night before!) so I can see what we have time for, add in fun events that come up, and adjust if anyone is sick.
Still think it sounds like a lot? Remember that the food treats don’t have to take hours–and in fact they shouldn’t if you want to work with kids in the kitchen! Grab a box of sugar cones, slather them with frosting and decorate with sprinkles and candy. Making peppermint bark is easy and the kids love crushing the candy canes. The same is true with crafts. Pick up some wooden ornaments at the craft store and let the kids loose with paint. Swirl paint around inside clear glass ball ornaments. You’ll treasure the memories and the ornaments when you unpack them next year.
Check out my Pinterest Christmas Activities with Kids board for fun food and craft ideas that will help you have your advent calendar filled in no time.
Stay tuned, for I’ll be sharing how we focus on the reason for the season and keep on learning while celebrating!
Our Thankful Tree
Our favorite decoration for the Thanksgiving season is our Thankful Tree.

I made the tree from brown craft paper that comes on a roll. I taped a piece onto a door in our main living area and sketched a tall tree. Don’t worry, it’s easy–I used this tutorial for how to draw a fall tree from Art Projects for Kids, minus the leaves! I covered the sketch with contact paper before cutting it out so I can reuse it year after year. I simply tape it to the door and we’re ready to add our leaves.
For leaves we use leaf shapes I cut out with my Cricut. If you don’t have a Cricut or similar paper cutting device, there are lots of other options: have your kids cut out leaves (hey, just call it fine motor skills practice), buy a leaf paper punch at a craft store, and I’ve also seen packets of silk and paper leaves for decorating and bulletin boards at craft and dollar stores.
Every night at dinner we each write something we’re thankful for on a leaf and add it to our tree. Our leaves usually include everything from family members and our health to Legos and coffee.
We started doing this a couple years ago and it has become a cherished tradition. It’s a way to focus on all we have to be thankful for during the Thanksgiving season, not to mention a reminder of our blessings before the season that encourages kids to think of lists of wants.
10 Crafts & Art Projects to Enjoy For Fall
We’re deep into fall here in Maine: the leaves are brilliant and the air is crisp! I love fall and one of the ways we savor it is with crafts and art projects. There’s the beauty of autumn to celebrate, along with Halloween and Thanksgiving. Making things is a way to slow down and enjoy the season and holidays. It’s great for fine motor coordination and creativity…and it’s just plain fun! Here are some projects we’ve done, and some we hope to do this year:
Fall:
1. Fabric pumpkins: We all enjoyed sewing these adorable pumpkins last year. They’re easy and make perfect decorations to tuck in here and there or give as a gift. The only thing we changed was using a rolled up piece of brown felt as the stem.

2. Acorn cupcakes: We made these cupcakes topped with a Hershey Kiss and Nilla Wafer acorn at a “Mommy and Me” cupcake decorating class in our town–they were cute, delicious, and easy!
3. Tricia from Hodgepodge generously shares many free pastel tutorials. We already tried our hands at the chalk pastel apple, and the tutorial for a fall tree looks beautiful, too.

4. Art Projects for Kids has several good tutorials to help celebrate the beauty of the season: how to draw a fall tree (my daughter used the easy instructions for drawing a tree’s basic shape last year), how to draw a pumpkin, and my must-do for this year, a scarecrow portrait using Sharpie markers, crayons and watercolors.
Halloween:
5. We made these recycled jar jack-o-lantern luminaries last year with a little Mod Podge (love that stuff!) and tissue paper.

6. Bat mobile: This year I want to sew this more-goofy-than-spooky bat mobile. These will be so cute hanging around the house!
7. Making mini pumpkins from acorns is a must this year–they’ll be perfect for my daughter to use to decorate her wooden doll house. (Be sure to read the comments on that craft about checking your acorns for insects!)
8. My kids love pop-up cards so these haunted house pop-up cards are a perfect project for a quiet afternoon.
Thanksgiving:
9. These wooden turkeys made from a 2×4 may be our cutest Thanksgiving project yet. It took a few days to finish and left lots of room to personalize. You use scrap lumber (mine wasn’t actually a 2×4, but a 1×4), popsicle sticks and a paint stick.

10. Oreo turkey pops don’t even require real cooking. Some day I want to try making cake pops, but these are darn cute and way easier.
Check out my Fall Arts & Crafts board on Pinterest for more ideas.
Too many crafts, too little time!
Hi, I'm Heidi and I homeschool my two sweet kids. I want them to know that learning is an exciting lifelong adventure! We love great books, unit studies, notebooking, lapbooking, and hands-on learning.