 Hi, I'm Heidi and I homeschool my two sweet kids. I want them to know that learning is an exciting lifelong adventure! We love great books, unit studies, notebooking, lapbooking, and hands-on learning.
A Week Filled With Good Things
This week was filled with easing back into our full time schedule and extracurricular activities after the flu. We made time for afternoon rest and early bedtimes, and continued lots of cozy reading aloud. In fact, this week felt very in tune with Charlotte Mason’s philosophies. I am by no means an expert, but our homeschool does feel full of good things when I implement her methods. We enjoyed good books, poetry, nature study, and composer study.
What books are we enjoying right now?
- We flew through Little Town on the Prairie and feel the impending sadness of the time when Laura’s story won’t be part of our days. My daughter has asked if we can just start again at the beginning.
- American History Stories from Heritage History. (That’s a selection from the Early America CD, which you can receive for free if you purchase any other CD and use the discount code SCHOOLRM until January 31st.) This series is giving my kids (and me!) a good overview of the time period we’re studying while allowing us to spend more time on major events.
- The Burgess Bird Book for Children is part of our nature study focus on birds. The stories are fact-filled and the personalities of each bird we meet keep it engaging.
- We just started The Cricket in Times Square for our homeschool book club…it’s also very engaging so far and leads to cries of “You can’t stop there!”
- I shared poems from A Small Child’s Book of Cozy Poems all week.
Nature study goes to the birds
Our nature study is deepening as we become more and more intrigued by birds. There are three reasons for our increased interest: we’re gearing up for the Great Backyard Bird Count in February, we’ve seen new birds at our feeders, and we’ve been watching nest cams! On these down days requiring a little extra rest we’ve watched this hummingbird nest cam in California and this eagle cam in Florida and been fascinated by the lives of these two (very different) bird families.
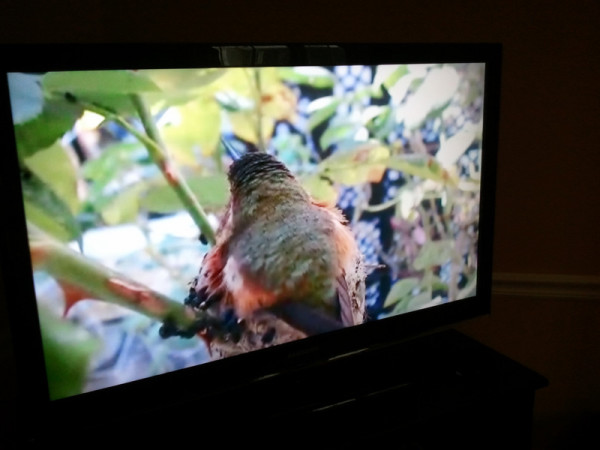
Obviously in nature study the goal is to be out in nature in direct contact with the items you are studying, but these live streaming videos enable us to watch events that would be impossible otherwise. We’ve watched the baby hummingbirds politely excrete wastes over the edge of the nest, how often the momma has to feed those babies and how she does it. We exclaimed as we watched Daddy eagle drop off a fish for his eaglets and their mom. The interest spurred by watching these bird families led to checking out more books at the library!
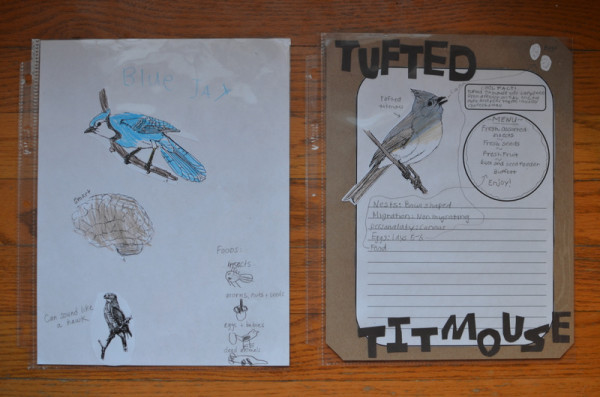
I had my children pick their favorite from our backyard birds and create a notebook page this week. I love setting them free to notebook as they choose and watching them make the work their own. You can download a free coloring book from Cornell with great line drawings. I like the images but not the questions, so they colored the image, cut it out, and pasted it onto their notebook page of choice. Then they added the details that interested them.
Composer study and our first try at SQUILT
In Harmony Fine Arts our composer of the month is Mozart. We listen to his music during quiet time each day. I’ve been wanting to try the SQUILT technique from Mary at Homegrown Learners and have them really focus on a piece of music. (This post explains the basics of Super Quiet UnInterrupted Listening Time.) She posted a new SQUILT lesson on Mozart yesterday so it was the perfect time to try it.
SQUILT was a great addition to our fine arts studies using HFA! I plan for SQUILT to become a regular part of our week using one of the songs from our composer of the month. Mary’s downloadable SQUILT form was a perfect fit for my ten year old piano-lesson-loving daughter, but I gave my son a sheet of plain paper to draw on.
Mary’s advice on younger or more wiggly children–to allow them to move around during the music and draw on plain paper–was helpful for my seven year old son. If I said “You must sit still and not move and then write words on this paper in these squares” I would turn his happy, open attitude about our classical music studies into dread.
I did learn one thing with our first go-round: my silly son wanted to make faces (albeit to the tempo) to entertain his sister, so we’ll be facing opposite directions or have our eyes closed next time!
And just for fun…
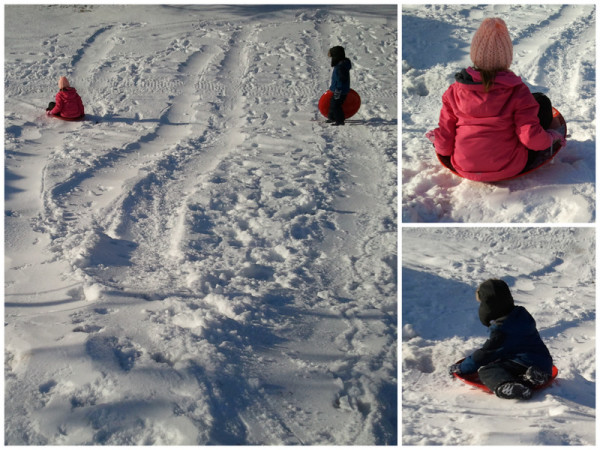
The week ended with a little fun in the snow. I dare an adult to watch a kid flying down a hill on a saucer sled and not join in. I had to jump on a sled and try it out…I laughed the whole way down but I think I’ll have bruises to show for it!
In case you missed it:
I shared a spur-of-the-moment simple hands-on math activity with odd and even numbers. The concept and vocabulary clicked for my seven year old. (You know, that same little boy that made faces during our classical music selection?) He loves (and needs) hands-on learning and asked to play the same odd-even game several times this week.
Thank you to the wonderful hostesses with fun link-ups on Fridays. Be sure to join the fun and see what other homeschoolers are up to!


Still Learning During Break…and a Little Schedule Adjustment Makes a Big Difference
We had a terrific holiday break, and I hope you all enjoyed some wonderful time with family and friends. If you were smart you didn’t enjoy as much fudge as I did. Luckily we finally got the snow my kids have been wishing for, so I also had to do some shoveling!
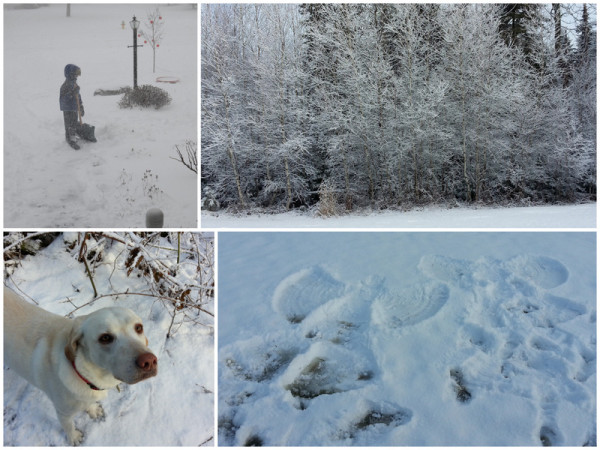
More than one snowfall occurred over break and we took full advantage. My opinion is if it’s going to be cold we might as well have snow–it’s pretty and lots of fun for kids (and dogs!).
I put aside our formal curriculum during December to focus on Christmas activities (which still involved lots of learning), with a plan for nothing but friends, family and fun from the week before Christmas up until the new year. The part I love is that we just can’t stop learning!
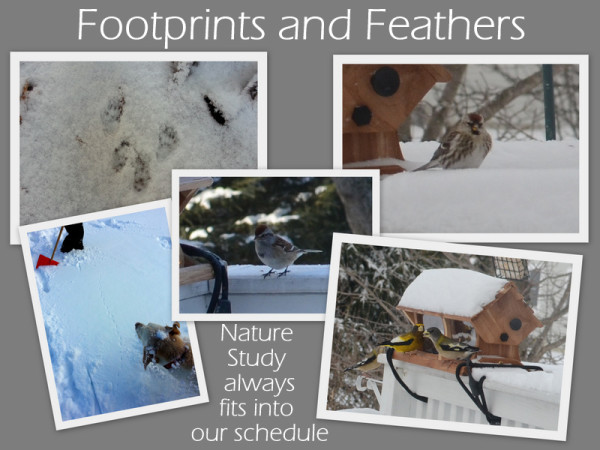
Nature study has become something that occurs just naturally (pardon the pun) for our family! We found tracks to identify in the fresh snowfall and new-to-us birds to look up in my Christmas gift–the Birds of Maine field guide.
We also met (and fell in love with) my brother-in-law’s Turkish girlfriend and asked her a million questions about her country and culture. Luckily she’s patient and loved us right back so hopefully she didn’t mind. The homeschooler in me chuckled at how much we were learning on our vacation!
On New Year’s Eve I was far too tired to think about staying up until midnight. Here’s a trick I’ve used before: use time zones to cheat. We rang in the New Year with London. At 7:00 pm we toasted while watching the fireworks and listening to Big Ben on the BBC.
We also opened our 2012 time capsule. Last year I typed up a quick questionnaire with things like height and weight, favorite shows and activities, and resolutions for the new year. We rolled them up and put them in a paper towel tube and packed them in with our Christmas decorations (so I wouldn’t forget about them…not that I forget things like that…). We had several giggles reading over them. Oh, and I won the award for most weight gained. I wish I was kidding.
We had a lot of fun over the holidays, and the change was long enough that we were ready to jump back into our regular routine. The break was also a good time for me to evaluate things. One area I wanted to address was our morning start time, which seemed to be later than desirable on too many days.
As I read Charlotte Mason’s writings I was reminded that my habits must be in order if I want to pass on good habits to my children. Some self-reflection helped me notice I sometimes get lost on my computer or throw in a load of laundry or do other things and neglect to get myself ready on time. My daughter also takes longer to “beautify” herself (her word choice!) than when she was younger, so she had to make some adjustments to her morning. She and I brainstormed and came up with a workable plan.
I set a time for myself that I must get in the shower and this begins everyone’s “get ready” routine. Sounds simple, but it was necessary–I had embraced the flexibility of homeschooling a little too much! The other change was that in our previous schedule we had breakfast and watched Student News before heading upstairs to get ready for the day, then met back downstairs for school. With the new plan we’ll be getting ourselves ready earlier and then meeting for breakfast and the news once we’re all dressed. Then it’s easy to hop directly into our work!
We’ve had three mornings to try it out, and I must say the mornings are running more smoothly and we’re starting promptly–which leads to finishing our work and all of us having extra time in the afternoon to pursue our interests. I’ll let you know how I do at sticking to this new routine until it’s a habit!
Thank you to the wonderful hostesses with fun link-ups on Fridays. Be sure to join the fun and see what other homeschoolers are up to!
Nature Study ~ Trees

I wrote about how we kicked off our nature study focus on trees by writing poems about trees. Since then we’ve been learning a lot about trees and I still feel like we’re just beginning! I set up our nature table with any tree-related specimens and books and we added more cones and leaves throughout our study. (Just a side note: I keep boxes in our basement for nature items and only display the ones for the nature topic we are focusing on. Rotating what we have out keeps it more interesting.)
Leaves
One of Barb’s posts from a couple years ago on Seasonal Tree Observations linked to a great printable for leaf shape and arrangement. It is one of those things I’ll add to my binder and try to learn but I have to reign in the urge to download my brain into my children. Charlotte Mason cautions against talking at your kids so much in nature that you take away their chance to experience it and see what they are interested in. (Here’s an older post of mine about stepping back when we’re in nature with some advice straight from Ms. Mason.) If I focus on learning the information myself I can answer questions and teach vocabulary in context as we marvel at the things we see. The author of the Handbook of Nature Study states it this way:
The child should never be required to learn the name of anything in the nature-study work; but the name should be used so often and so naturally in his presence that he will learn it without being conscious of the process.” ~Anna Botsford Comstock
We’d been enjoying Maine’s beautiful foliage displays so our first quest was to understand how and why leaves change colors in the fall. We watched a short video from the Maine Department of Conservation about the changing colors in leaves. We brought some brilliant yellow leaves in and examined them with the stereoscope and microscope. The kids drew as a way to record what they saw. This quote from my son illustrates why I love using a hand lens, stereoscope and microscope when we can:

“I didn’t know leaves were so interesting!”
We learned about another timely aspect of fall: there is a thin layer that forms between the leaf’s stem (petiole) and the twig, allowing the leaf to drop and most importantly to kids: leading to piles like this to jump in!

Learning about the cycles of leaves forming a separation layer, then falling off and feeding the tree as they break down into the soil, followed by new buds in place just above the scar waiting to be next year’s leaves led us to take a trip around the yard to see these signs of years past, this year, and years to come on our own trees.

With the excitement of brilliant fall leaves we focused on deciduous trees initially, so then it was time to move onto evergreens. We made our annual trek to the Christmas Tree Farm and our studies continued with a beautiful specimen right in our living room!

Flowers, Seeds and Cones
I’ll look forward to revisiting this topic in the spring and early summer when the maple trees in our yard bloom, but fall was a great time to study cones and acorns. We were able to get a good look at two different types of cones and one variety of acorn. I grabbed cones from the ground under two backyard trees and placed them in empty cardboard containers so the kids could watch the transformation and see the treasure inside a cone.

Bark
The bark looked incredible under the stereoscope. We read in one of our books about how bark was like skin to protect the tree, but since it doesn’t stretch it looks wrinkled and peeling and has cracks. That is how the tree expands as it grows!

Roots
We took a couple hikes during the month to enjoy time in the forest. It gave us a good chance to observe some root systems of trees that have fallen. My son said this one looked like a dinosaur with a large eye and mouth coming out of the ground!

Trees just seem to spark the imagination. This tree immediately gave my daughter an idea for a story, with the cut branch being a secret keyboard to access an underground world.

Identification
Our neighborhood is relatively young, and many of the trees in our yard (21 to be exact!) have been planted by me in the past 5 years. I’ve been working to identify those that were already planted. My plan is to make our own field guide beginning with the trees from our yard (Outdoor Hour Challenge #7). We were inspired by a local homeschool family who showed us their leaf collection and this post from Brandy at Half-a-Hundred Acre Wood. She includes a free printable notebook page to identify and record the tree and a leaf sample.
Luckily I’d collected and pressed leaves from a few trees this fall. I want to include actual leaves and seeds when possible, and photos of items like cones and bark. We’ll have to continue this project once there are leaves to be seen outside in Maine…like next May. Commercial field guides are a wonderful resource, but there is great value in making your own book of things you have right outside your door.
After we learn a little about our different trees we’ll choose one for a year-long study. We’ll probably start with the large spruce that forms part of what my kids call their “secret hideout” with it’s large drooping branches. Barb has a helpful post with ideas for a year-long seasonal tree study and I also like this post that will persuade you of the benefits of studying one tree over the course of the four seasons.
Book and Internet Resources:
- The Handbook of Nature Study: the resource for all our nature study, used as a reference for me (not a read aloud).
- Barb at The Handbook of Nature Study Blog continually inspires me to study nature with my kids. She has a great reference page with links to many of her tree studies (both specific trees, parts of trees, and seasonal ideas) and a free download.
- National Audubon Society Pocket Guide: Familiar Trees of North America East: I like this small, colorful field guide. For each tree there is a sillhouete to show the overall shape, a full page photo (not drawing) of the leaves, and a small close-up of the bark. My only complaint: I wish it had a photo of the cones or seeds for each tree.
- I came across a great book at our library that I’ll be adding to our collection, though it is only available used. Inside and Outside Trees by Sandra Markle is filled with beautiful photos and easy to understand explanations. This was a perfect read aloud: just a couple pages at a time and then we’d look for the things we read about during our outside time. It helped the kids have lots of “a-ha” moments when they found a leaf scar or something else they could recognize from the pictures in the book.
- Eyewitness Books: Trees is another reference we used. When you can’t observe everything up close and personal in nature the gorgeous photography in the DK Eyewitness Books is a good stand-in.
- An online guide to the parts of a tree: this has some of the same information from the printable in Barb’s post (on leaf shape and arrangement), but also has nice graphics for tree shape, twig structures, and the different types of flowers, seeds and cones. It does not give you the identification, but helps you learn about the structures used in identifying trees. That way if you read details about a tree’s stipule scars, incised or pinnately compound leaves, or drupes you know what on earth to look for.
- The online guide from the Arbor Day Foundation called “What Tree is That?” is the best resource I’ve found for identifying a tree. It is so easy to use: just answer one question at a time to arrive at the identification. My kids enjoy using this with me as I ask them the questions and they tell me which choice on the screen applies to the tree we’re looking at. We used this to identify our Christmas tree as a balsam fir.
- I always try to find a few related picture books for fun. This time we’re enjoying: Christmas Tree Farm by David Budbill, an illustrated picture book of a Robert Frost poem called Christmas Trees, and Arbor Day Square by Kathryn O. Galbraith (which also ties into our history studies–it’s about the beginning of Arbor Day out on the prairie in the 1800’s).
Now our nature table has been cleared off to make room for our Christmas Village. Our homeschool runs pretty differently during December. Over the next couple weeks I’ll be sharing how we focus on the holiday and still learn a lot. And then looking ahead in our nature study we’ll start a focus area on birds in January. That way we’ll be ready for our second year participating in the Great Backyard Bird Count!
Nature Study ~ Kicking Off Our Focus on Trees With Poetry
I’d intended to start our nature study focus on trees a couple weeks ago when the beauty of the fall leaves was at its peak in Maine, but we were very busy preparing for our science fair. Then my basement flooded and messed with all my plans!
To get back into the swing of nature study (and do something that didn’t require a lot of planning or knowledge from me) we took a walk around our neighborhood using the ideas in Barb’s Outdoor Hour Challenge #2, Use Your Words. My daughter recorded a list of the words that came to our minds when we looked at all the trees on our walk. Our neighborhood is fairly young (20 years), and though most house lots had originally been completely cleared there are woods surrounding the neighborhood and many lawns are adorned with a variety of trees. I’ve enjoyed paying particular attention to the variety of leaf color and timing for the change. Many trees in our neighborhood are now bare, but a maple in our back yard is just glowing with gold leaves now.
The next day as the rain poured down and the wind howled, we spent a cozy evening turning our words about trees into poetry using Barb’s free printable with easy suggestions. Each of us used a different idea. My son (age 7) traced leaves I had pressed weeks ago, added veins, and I wrote his selected words inside the leaves.

My daughter (age 10) was intrigued by the cinquain idea. I was very proud of her work.

I joined the fun (the kids love it when I do). My particular interest was noticing the pattern of colors on each of the pressed leaves I traced. I wrote my words around the perimeter of my leaves.

Our poems are hanging on our wall, and we are excited to spend some time studying trees. Our first question: why do leaves change color?
Before I end I have to add a note. On our walk some movement in a fake spiderweb at a neighbor’s house caught my eye. I looked closer and realized a small bird was caught. Long story short, we had to help him. The neighbors were not at home, but with the help of another neighbor and her scissors we soon had this beautiful nuthatch free from the web. He was very shaken up but did not appear injured. After some time in a box and some conversations with a bird rescue organization he flapped away from us up into a tree.

We had to leave an hour later and he was still there. We named him Webber and hope he goes on to live a long and happy life. The woman who answered my calls at the bird rescue organization told us that often owls get trapped and end up hanging for hours by a wing or leg. I tell this story because after we saw firsthand the danger of those fake spiderwebs to wildlife I said I’d spread the word. This is my little part of helping the birds.

Digestive System Demonstration

For our homeschool science fair my seven year old son’s topic was the human digestive system. He is a hands-on learner so I wanted him to have a physical demonstration to present. I wanted a demonstration he could do with very little help from me and explain to an audience. I’m happy to say that after several trials and adjustments at home his presentation at the science fair this week was a success!
Demonstrating the Steps of Digestion:
Want to show your kids the wonders of digestion? This demonstration was great in front of a group of kids, but simple enough to do at home, too. I am pretty sure my kids won’t forget the steps of the digestive process after this.
Supplies:
- small dish (large enough to use masher in)
- peanut butter sandwich
- small amount of water
- 1/2 cup milk
- scissors
- masher
- funnel (optional)
- quart size Ziploc bag
- Coke
- knee high pantyhose, or a leg cut off of child’s tights
- large bowl or basin
- tray with paper towels
Step 1: Explain that the small dish is like your mouth. Begin to cut the sandwich into bite-size pieces, explaining that the scissors are acting like your front teeth, which are designed for cutting.

Step 2: Pour in a small amount of water. This is the spit. (Expect giggles here.)

Step 3: Add about a half cup of milk. Peanut butter sandwiches can be a bit dry, you know.

Step 4: Use the masher to mash the food and drink, explaining that the masher is like your back teeth which are designed for grinding up the food.

Step 5: Once the sandwich and milk resemble slop, empty it into the quart size bag which you can explain is like the stomach. You may dump it directly in the bag, or through a wide-mouth funnel to stand in as the esophagus. This process required an extra set of hands, thus a lack of photos for this step!
Step 6: Add a little Coke. Explain that the stomach has chemicals (acids) that break down the food. [Note: Saliva also works on food break down as do other enzymes and bile added in the small intestine–given the age of my son I kept it simple. You could certainly add a little green food coloring and talk about the liver, gallbladder and bile…then there’s the pancreas…]

Step 7: Using your hands mix the food and Coke in the bag. Explain how your hands are working like the muscles in the wall of the stomach mixing and churning this slurry. This is when it starts looking a little gross. (Depending on your audience you could pause here and mention the process of vomiting.)

Step 8: Now the food is ready for the small intestine. Have your basin ready and pour your slurry into the nylon. Liquid will leak out through the material. You can explain that the fluid is like nutrients your body is removing from the food in the small intestine. Feel free to squeeze a little for effect.

Step 9: Now for the large intestine. You could squeeze the food into a second nylon, but we just stuck with one and explained that the food was now moving into the large intestine. Lay the nylon on multiple paper towels layers and roll it up tightly, squeezing and patting as you go. Explain that our body takes all the available water out of the food that remains in the large intestine.

Step 10: That’s where we left it at science fair. We’re pretty relaxed around our house, especially in the name of science discussion. But I didn’t want to offend any other families so we chose our words carefully and left the “remains” in the nylons with a simple explanation that the next step would be the toilet. (You can cut a small hole in the nylon and demonstrate the working of the anal sphincter if you want to get technical.)

These are a couple of the websites and videos that gave me ideas to try: Teaching in Room 6, and this Squidoo lens.
In addition to demonstrating the steps in the digestive process we added two other hands-on components that were so simple yet illustrated so much.
Demonstrating Peristalsis:
How does food move through the digestive system? It’s simple to demonstrate. Take a section of nylons or tights open at both ends and a smooth round object. I used my 10-year old daughter’s tights and one of the large plastic Easter eggs. Hold the section of tights up with the round item in it, showing that gravity is not forcing the egg through the tights. Using your hands you can demonstrate the contraction of muscles that pushes the food through.

Visualizing the length of the digestive system:
This one really floors the kids. The idea for this demonstration came from a combination of one of the hands-on labs included in our Real Science Odyssey Life Level One curriculum (a good example of the simple activities that curriculum includes for hands-on learning) and the Science Matters blog. We cut various strings and yarns to the length of the actual organs in the digestive system. I liked the idea of making each item a different color or thickness to more clearly show the relative sizes. This is an easy one to just use what you have (rope, yarn, string, twine, flexible tubing, even a bag or bottle for the stomach if you’d like) to demonstrate the true-to-life measurements of a child’s digestive system. My son LOVED unrolling this one at the science fair.
- mouth (3 inches)
- esophagus (10 inches)
- stomach (6 inches)
- small intestine (15 feet)
- large intestine (4 feet)
Trust me, everyone’s eyes get big when you unroll the rope and tell them that their digestive system is that long, all coiled up inside their body.

*Note: if you like using accurate vocabulary, this was a great way to also demonstrate the difference between the small intestine and large intestine. I used a thin rope for the small intestine and a thick rope for the large. It helped my son understand (and then explain to others) that the small intestine is actually much longer than the large intestine, but is smaller in diameter.
Resources:
Other than the specific resources I listed already, these are the books and other things we used to learn all about the digestive system.
Magic School Bus Human Body: I love this DVD, and in the episode called “For Lunch” the bus travels through Arnold’s digestive system.
Easy Make and Learn Projects: Human Body has a terrific digestive system poster with flaps. We blew this up and used it as our display at science fair.
Blood and Guts: This book has fun-to-read explanations and a lot of hands-on demonstrations and experiments for the entire body.
Kidshealth.org has a short video on the process of digestion.
Have fun with hands-on learning about the digestive system!
Nature Study ~ Focusing on Insects and Spiders
We enjoy nature study using the gentle leading from Barb at the Handbook of Nature Study blog. When I purchased her “Getting Started” ebook and read in Challenge #4 about picking a focus area the idea made so much sense! When her September newsletter came out with a focus on insects and I saw that arthropods were coming up in our formal science curriculum, picking our first focus area was easy: Insects & Spiders.
I gathered related books, field guides and flashcard sets, our magnifying glasses, some specimens (purchased in acrylic and ones we’ve collected in jars). I placed all these items on a sofa table that I dubbed our “Nature Table.” The kids were intrigued and I saw a lot more handling of the specimens and flipping through the books with them all on display. It also made it easy to identify bugs we saw with all the insect books in one place.

Using the September newsletter planning chart I mapped out topics I hoped to cover. She said picking a focus area helped her family learn much more in their area of concentration and that they would see more of whatever item they were focusing on, and I found this to be true in our family. Here are some of our nature study highlights for the month:
- We did a lot of reading, finally going through all the wonderful introductory pages in our Complete Guide to Insects and Spiders book.
- We watched some great videos. We always watch the YouTube links in Barb’s Outdoor Hour Challenge posts because we can see things we don’t have the good fortune of observing, like a spider spinning a web or cricket making it’s “music.” National Geographic Kids also has fun short videos and slideshows.
- We went on focused bug hunts, but also found ourselves pointing out insects to each other everywhere we went! Sometimes it seemed like insects and spiders were just waiting to be observed by us.
- Barb’s September grid gave us some things to look for on our nature walks. We found insects of many different colors, looked for ways they camouflage themselves, watched bees, and turned over rocks and logs. One of the challenges also involved looking at things through a bug’s eye view, which my son thoroughly enjoyed.

- This large spider is the perfect example of why a nature study focus area worked well for us. This exit door we’ve walked by a hundred times, but last week I noticed this spider and we stopped to observe and take photos. We admired her web (and knew it was an orb web after our studies). The most exciting part was searching all around for her children after reading about how the young spiders cast out on a line of silk in the wind. A few were in the same window! We then went outside and searched around the building, finding lots more smaller spiders that looked just like her.

- We went on a few bug hunts in our backyard. We placed a Japanese Beetle and earwig in jars and the kids both completed a notebooking page (free from Primary Possibilities) for their journal. My daughter loved the organized format, once again my son preferred the blank page and just turned his over to draw on the back! That’s the beauty of notebooking: flexibility.

I’m not ready to wrap up this area yet–I’d like to talk about grasshoppers and flies. Barb mentioned spending six to eight weeks on one focus area and I think that will be a good time frame for us. At four weeks we still have more I’d like to cover, but after a couple more weeks we’ll be ready to move on.
Have you tried having a focus area for your nature study?
Our Homeschool Journal: A Full Week!
In our homeschool this week…
It was a busy, productive week. Our Time Traveler’s history focus was inventions of the 1800’s, and we had a lot of fun learning about the cotton gin, revolver, sewing machine, and steamboat and how these inventions impacted life in early America. Daddy, a licensed amateur radio operator, stepped in as a guest instructor for Morse Code. I need to arrange guest instructors more often! It was a highlight of the week.
We studied the phylum Cnidaria in our science curriculum (RSO Life Level 1), with a hands-on model of the jellyfish lifecycle.

In other science learning, nature study was part of nearly every day! I’m so thankful Barb makes it easy to implement nature study because it adds so much enrichment to our homeschool. The kids checked a few more things off the Last Days of Summer grid while I worked in the garden. We took a little walk another day and did Challenge #1 from the Outdoor Hour Challenge ebook.
Our item of interest ended up being mushrooms and we learned about them after returning home. The topic that intrigued us was related to our earlier science studies about plant cells and chloroplasts–why are mushrooms not green? Using the Handbook of Nature Study we learned it’s because they don’t have chloroplasts to manufacture their own food, but use decaying plant matter for food, thus doing the world a great service in addition to feeding themselves!

We also did the weekly challenge on ants. Our backyard ant hills are a bit quiet this time of year, but we tried to stir them up a little and noticed we have a least two different kinds making a home near our gardens. It was fun, as usual, to see the differences in what my kids were interested in: my daughter loved the structure of ant hills with separate rooms. We read the information in our books and then also did a little internet research to find some diagrams. My son was intrigued by the information in the Handbook of Nature Study on ant battles and how they can go on for days and involve fighting to the death.
The other idea from Barb’s Getting Started ebook was to pick a Focus Area, and for us the next month or two will be all about Insects and Spiders! I really like the idea of a nature focus area, and we have a catch-all console table that I’ve now turned into our nature study table. I combed our shelves and came up with several books and flash card sets. My son has a few interesting specimens in acrylic and we have a few insects we’ve collected in jars. I’ve set these all up on our nature table and we’ll be on the lookout for opportunities to study insects and spiders in our nature study.

Helpful homeschooling tips or advice to share…
No need to be derailed by minor illness! My youngest was starting with a cold one morning. I’m always thankful I don’t have to ask myself: “Do I send him to school or not?” That used to be so tricky, trying to weigh how they felt or if they were infectious with what they were missing. We don’t call off school at home for minor illness, but try to make adjustments to continue learning and give comfort to whoever is under the weather.
First step: The Sick Couch. That’s an official family name for the cozy spot we bestow upon the sick member, loaded up with pillows and blankets and stuffed animals. We pull the table closer and stock that with tissues and treats. This time I made a homemade hot chocolate that was well-received.
Then we continue with the things we can (all from the “sick couch”) and usually make adjustments like extra reading aloud or an educational show. This time we brought out our popular Magic School Bus Human Body DVD and he watched “Inside Ralphie” while I worked with his big sister.
Places we went and people we saw…
Did you know that a little town in Maine was involved in the War of 1812? We had a fabulous time at Hampden Heritage Days, a free event put on by the historical society at a historic home.

We learned about the Battle of Hampden and a chambermaid who threw the contents of a chamber pot on some British soldiers attempting to gain access to the home. We were able to step inside Hannibal Hamlin’s law office (vice-president with Lincoln during the Civil War). We also enjoyed many glimpses into life in another time period, and imagined what it would be like: sleeping on a rope bed, having to hand-make so much of what you needed, and handwriting that was really an art form. Some of it looked hard, but some of the simpleness of the time is always appealing. I loved the “Nanny-Rocker” where a mother could lay her baby to rock while having her hands free for handiwork, or how the spinning wheel was made to be portable so women could bring them when they socialized.
My favorite thing this week was…
Good friends coming to dinner! I love the flexibility we have to schedule social time as a family, and I also love when we have guests because my husband cooks the not-so-healthy meals that we generally avoid like creamy haddock chowder!
My favorite resource this week…
Erica from Confessions of a Homeschooler posted her World’s Greatest Artists study for FREE this week. The printables and activities are a great addition to our Harmony Fine Arts curriculum and I was excited to download it and go further in our study of Renoir this month! I’m continually amazed and appreciative of homeschool bloggers sharing their hard work and talent with the rest of us!
Things I’m working on…
Putting together our first unit study for the year: it’s a little mix of Elections, Government and the Presidency geared for elementary age students. I’ll post my plans as soon as I finalize them–hopefully within the next few days after I receive all the books I’ve ordered.
We’re reading…
My 10-year old is still working on Nancy Drew and the Clue in the Crumbling Wall, while my 6-year old pours over a book on Tanks. Our read alouds are On The Banks of Plum Creek from the Little House series, and Treasure Island. Yes, the full, unabridged version! I was wondering how my six year old would do, but it is pirates after all! I found an audio version but it was read too quickly, so I’m reading it with as much panache as I can manage, and going slowly enough and stopping often enough to be sure they understand. As we’ve gotten into the story we’re all really enjoying it. I love the opportunity to read all the great books I missed!
I’m reading For the Children’s Sake by Susan Schaeffer Macaulay. I have it on interlibrary loan but will be adding it to my shelf when I can: it’s one of those I could see myself re-reading frequently for inspiration and encouragement in the Charlotte Mason philosophy.
Thank you to the wonderful hostesses with fun link-ups on Fridays. Be sure to join the fun and see what other homeschoolers are up to!
Our Homeschool Journal: Nature Study (No Thanks to Mom)
In our homeschool this week…
We spent most of the week camping. It was our last trip since here in Maine the nights will be getting too chilly for sleeping in a pop-up camper right next to the ocean. I said we were going to try and cross off everything on Barb’s Last Days of Summer grid, and we got a running start: seven boxes checked off!
Other than the grid I had planned on the week being pretty low-key for education. I brought along an art project (more on that later) and our current book for reading aloud, but otherwise planned to just relax before we start full-time school next week. A lucky circumstance turned this trip into an educational treasure! While beach combing we noticed a lady searching alone. My six-year-old, who we think may be a politician someday, struck up a conversation with her. Turns out she used to work in education and was here for the summer as a volunteer to work on interpretive materials. How lucky for us! She seemed to enjoy the company of our kids and we left knowing a lot more about nature at our favorite place…no thanks to me and my fabulous homeschool mom planning.
The favorite tidbit my kids picked up was when my daughter asked this kind lady what made the little tiny holes in mussel shells. Turns out it’s a snail called the dog whelk. It eats mussels, which are larger than they are, by attaching to their shell, using a chemical to soften the shell, and then using their radula (like a tongue) as a drill to make that little hole. A squirt of their special saliva drugs the mussel, then a digestive enzyme turns the mussel to soup, then they suck it out through their tiny hole. Fascinating!

Since schools in our area are back in session it was pretty quiet at the beach. We were able to witness more activity from the seagulls than usual. We became intrigued watching them feed. They would pick things up from the ocean and fly up over the beach to drop them on the rocks and eat what was inside the shell. I was able to run to catch a closer look when one gull was done, and found his just-emptied sea urchin shell. We also witnessed the demise of a starfish. We decided a gull’s life looked pretty hard, but that they appeared pretty clever, too.
Helpful homeschooling tips or advice to share…
Be friendly! You never know what you can learn from people you meet just by striking up a conversation. My husband has encouraged me to be more like this over the years, and I see his personality trait in our son. Honestly, when I’d seen the woman on the beach I was sitting in the shade in my folding camp chair reading. I didn’t really want to chat, and I wasn’t even engaged with my kids combing the beach. Good thing my son followed in his dad’s footsteps!
My favorite thing this week was…
The weather! We’d had a lot of rain on our camping trips this summer, but the weather this trip couldn’t have been better. Warm and sunny but not humid or too hot, and perfect nights for campfires.
My favorite resource this week…
The art project I brought along on our camping trip was a chalk pastel tutorial from Hodgepodge. Their Nana gives them pastel lessons (lucky!) and Tricia kindly posts them for us to enjoy. We had a great time attempting to capture the beautiful sunsets over the ocean. If you haven’t tried one of Nana’s pastel tutorials I highly recommend it! It’s messy and fun and easy for all ages to create something special.
Things I’m working on…
Laundry. Post-camping laundry sometimes makes me want to run and hide. I also need to pull things together for the first week of school so I am organized with things printed or copied and ready to go.
I’m reading…
We’re near the end of Little House on the Prairie and enjoying this series so much!
I finished Beyond Survival: A Guide to Abundant-Life Homeschooling by Diana Waring. I can’t say it’s one I’d read again. I did enjoy the chapters on different learning and teaching styles and teaching multiple ages. I gleaned a bit from it, but though I don’t think the author meant it that way some sections made me feel we weren’t good enough. For example, when we visit with other families we don’t gather around the table and sing together. We try to get the kids to go play so us adults can talk. I’m looking for another, possibly more encouraging (and realistic for me) homeschooling book to read. Any suggestions?
I’m grateful for…
The seasons. I love the changes and trying to enjoy the best that each season in Maine has to offer.
Thank you to the wonderful hostesses with fun link-ups on Fridays. Be sure to join the fun and see what other homeschoolers are up to!
Nature Study ~ Enjoying the Last Days of Summer in the Garden

The last Outdoor Hour Challenge from Barb at the Handbook of Nature Study blog for August was all about enjoying these last warm days in the garden. Barb loaded us up with ideas for spending a little extra time outdoors. It was wonderful because not only were the ideas easy to do, but they had us all noticing little details and soaking up the garden with all our senses.
My favorite activity was probably sitting quietly in the garden for five minutes. That’s an unusual activity for a family with young kids! I set us up on a blanket in the shade with our nature study clipboards and we recorded what we heard and saw. 
We also brought a couple flowers inside and the kids drew them for their nature journal…and like Barb suggested they drew them BIG. I love having the kids draw things they see–it really slows them down and they notice details.

We did all the activities on the August Grid over the course of the week. The weather was beautiful, and we soaked it up. It’s good for those of us in Maine to try and store up as many summer memories as we can: our seasons are already preparing to change. You can feel the difference in the air at night, and many of my garden flowers are rapidly declining. It’s all good because fall is my absolute favorite season: crisp air, picking apples and pumpkins, jumping in piles of leaves! I’m not going to think right now about January, February, March…winter is long here but I’m enjoying the rest of summer right now. Barb posted another grid from her archives–it’s loaded with ideas and we want to accomplish them all!
I’ll be submitting this to Barb’s Outdoor Hour Challenge Blog Carnival.
Nature Study ~ Saying Goodbye to Our Monarch Butterflies
Watching the metamorphosis of a caterpillar into a Monarch butterfly first hand was the highlight of this summer’s nature study. I wrote about finding Monarch caterpillars and observing them form a chrysalis a couple weeks ago. We watched the jewel-like chrysalis and patiently waited. Finally one morning the first chrysalis looked dark, and if you looked closely you could see the beautiful orange and black wing pattern!

We were so excited and began watching, hoping to see it emerge. I had read they usually emerge mid-morning so we tried taking turns watching and I set my camera up for time lapse photography. We watched all morning and my camera took photos until the battery died…no butterfly. No one was watching when he finally emerged after lunch. This was the same caterpillar (“Big Guy”) who formed a chrysalis when no one was watching, too, so perhaps he’s shy!
Two days later it was Little Guy’s turn. The morning that we could see his black and orange pattern we were set to leave for a day trip, so I prepared the kids that we would miss his emergence, too. We were bustling around getting ready and I happened to peak in and could see a crack forming in the chrysalis! I yelled to everyone (causing the dog to bark wildly) and all four of us watched in awe as he emerged.

“I love you!” whispered my ten-year-old daughter, as if to a newborn baby.
“This is the most exciting thing of my life!” exclaimed my six-year-old.
Watching the emergence was amazing, especially how the body of the caterpillar was plump and the wings appeared small and shriveled. I had read that they need to pump blood into their wings, but hadn’t thought of where the blood would come from! We watched the body grow smaller as the beautiful wings expanded.
We had enough time to take in every detail of these beautiful creatures. We were reminded of things we’d learned during our nature study: we caught a few glimpses of the amazingly long proboscis, we noted the brightly colored surface of the wings when open, but the paler color of the underside when closed, we counted the four longer legs but looked closely for the two smaller legs near the mouth. The awe and wonder of a plump striped caterpillar forming a jewel-like chrysalis that appears to be adorned with gold, only to emerge 10 days later as this lovely fluttering butterfly!


We released both of the butterflies on the same day that they emerged, back into the lovely wildflower field we had found them in as tiny caterpillars. Off they fluttered as we said goodbye. We all hoped they were the generation of Monarch butterflies that gets to go to Mexico for the winter!

My kids turned to me and said, “We’re going to do this again next year, right?”
Absolutely!
Hi, I'm Heidi and I homeschool my two sweet kids. I want them to know that learning is an exciting lifelong adventure! We love great books, unit studies, notebooking, lapbooking, and hands-on learning.