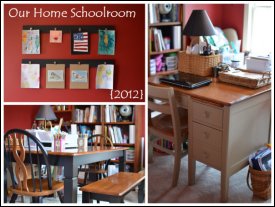
Our Home Schoolroom 2012
It’s about time I posted about our schoolroom here on Home Schoolroom!

We have a formal dining room in our home…and we aren’t formal dining kind of people. After it sat unused for a couple years, I turned it into my office and crafty space and painted it a deep red. I’d always wanted a red room! It was great because we could work on projects and leave them out. Then we decided to homeschool so now it’s still my office and a crafty space, but it’s also where most of our school supplies reside.
First let me say that not only are we fortunate to have a whole room to use, but that we’ve been very fortunate in finding some or our schoolroom items. I found free or very low cost items when a University was selling old furniture and when there was a sale at an area school when they were moving to a new building. I just had to keep my eyes open and be willing to do a little work to fix up the pieces! I also made a few items and used things we already had to complete our home schoolroom without spending a lot of money. Anyway, on to our room…
In the middle of the room you’ll find our work surfaces. This is my desk. (A lucky find for $15.)

The basket lamp is great for hiding some of my desktop clutter. The shallow basket is a good place to pile my papers that I plan to deal with soon. (Note to self: Deal with the papers in it soon.) There are also baskets on the floor on each side of my desk: one for yet more papers-I-plan-to-deal-with, the other for small sewing and knitting projects. Baskets are a necessity, they make my messes look nice.
This is the schoolroom table (our old dining table) where my children have their own workspace at each end.

At their workspaces are a wooden organizer and plastic drawer unit, both from Target, to hold pens, pencils, glue runners, a pencil sharpener and anything else to keep them from having to get up a dozen times when they’re working. They also have the 50-count pack of Crayola colored pencils. If you have the money in your homeschool budget I recommend upgrading to that pack. We use colored pencils a lot for lapbooking and notebooking and our nature journals. Having lots of colors to choose from is fun, and I find they work hard to look at the details to choose just the right color from all that variety. The organizers let them have the supplies they need, gives them a defined workspace, and still look cute!
The bench beside the table is perfect. If the three of us are working together on something we all sit there. I hope they’re never too big for that. (And that I’m not either!)

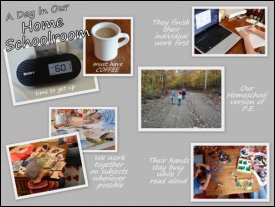
Tucked in between their spaces is my old laptop that they use for typing, Xtramath, Khan Academy and any educational computer games. We just slide it forward as needed.
Directly behind my desk is one of only two large wall spaces, and in a room this small we use every inch by going vertical!

The large magnetic board is used for All About Spelling. Finding a whiteboard that magnets stick strongly to in the size needed wasn’t cheap, so I made this one. It’s easy!
- I purchased a large black frame at AC Moore with a coupon for about $15.
- I had our local sheet metal fabricator cut a piece of galvanized steel to fit (he even let me pick the piece I wanted) for about $20.
- I removed the glass from the frame, slipped the steel in, and replaced the frame’s backing.
And for about $35 it was less than many of the large magnetic whiteboards I saw, and I love the way it looks!
Above that is an Advantus Grip-a-Strip display rail. I use it for maps, posters, timeline cards, art–you simply slip the item between the rails and rollers hold it in place; just push up and then pull down to remove it. The one complaint I have is that laminated items can slip out of the rollers. An easy solution I figured out: place a piece of blue painter’s tape on the top of the item. It doesn’t show but keeps the item from slipping.
Above that is yet another great find from the school sale: a set of roll-up maps (for $5!). I had wanted roll-up maps since I saw them used by Tricia at Hodgepodge as window blinds. Since we’re limited in wall space I thought it was a great idea!

I am in love with these and can’t wait to put them to good use. It took us half a day and around $35 of supplies to mount them, but since they hang right behind my head we wanted to be sure they wouldn’t come crashing down on me.
The wall you see from our kitchen is the “art wall.”

The rails make it easy to change out the artwork, and they were simple and inexpensive to make:
- Paint two long boards
- Use Liquid Nails to glue on some clips
- Install picture hangers on the back of the board.
Voila! A perfect place to enjoy the kids’ art for a while before it goes into their binders. (And a good drying place for wet art so the cat can’t walk on it!)
Below the art wall is our writing center. I was excited to organize our materials into a writing center after reading through the WriteShop teacher’s manual. For us this area is actually a combination writing, notebooking & lapbooking center.
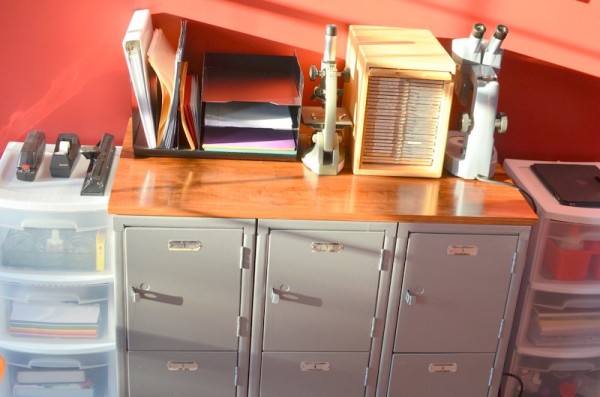
The base is my new favorite piece of furniture: a set of lockers I scored for $10 at the school sale! Some elbow grease and spray paint were all they needed to be the perfect storage piece for a home schoolroom. Beside them are plastic drawer units. (I’ve collected half a dozen over time and am always moving them around using them for different things).
Two lockers are reserved for my children as their writing cubbies. On top of the lockers is a desktop organizer for paper (lined, plain and colored), envelopes, file folders, sheet protectors, and a binder with notebooking pages to choose from. {Note: so far all my notebook pages have been free. Most are from The Notebooking Fairy, Homeschool Share, the Handbook of Nature Study Blog, and abcteach.} Other supplies in our writing/notebooking/lapbooking center are all sorts of paper (cardstock, printed scrapbook paper, stationery, specialty papers), papercrafting supplies (trimmers, fancy edge scissors, paper punches, adhesives, brads, stickers), a dictionary and thesaurus.
There are a few items in this section that are science related. (I had to overcome the organizer in me who really likes to stick with the theme.) One drawer holds experiment tools: goggles, beakers and test tubes–the stuff that helps us feel like real scientists. And on top of my lovely lockers sits two new-to-us very exciting items that we picked up at the school sale: a compound microscope (along with a wooden box to store slides) and a stereo microscope that will be helpful for examining interesting things we find.
On the opposite wall is a row of bookshelves (yup, all different sizes and wood finishes–use what you have).

In case you’re wondering, “Mr. Gooey” is a human body model with squishy organs, and “Mr. Bones” is a skeleton model that came with a book from Workman Publishing. Sorry I can’t give you an inexpensive source for the eye and ear: we got them for FREE at the school sale.
As you can see from my description of the schoolroom table, writing center and bookshelves I like giving the kids their own spaces: they like the ownership, and it’s nice to call for a “cubby clean-out” and have them be responsible for their areas.
This last photo shows the home part of the schoolroom: our dog’s bed, our cat’s cube, and a big comfy rocking chair.

The rocking chair was the one I rocked my babies in and now makes a great quiet corner to read. I can even still squeeze in with one child to work on something together. In small jars on the windowsill beside the rocker is our collection of sea glass from our ocean-side camping trips. On the wall between the windows is an antique printer’s tray that with a very special collection of heart shaped rocks that we’ve gathered for years. These are the items that bring the love of our family into our schoolroom.
Of course our “school” items spill over into the house. Nature field guides and binoculars are in the living room, a large hutch in the hallway holds the messier art supplies and educational games, and chapter books are in a bookcase outside our bedrooms. A lot of schoolwork takes place outside of this defined room: reading on a blanket on the lawn or cozy next to the fire, nature journaling on a walk in the woods, science experiments and art projects on the kitchen island…learning can happen anywhere!
I’m linking up over at iHomeschool Network’s Not Back to School Blog Hop. Click over to check out other schoolrooms!

 Hi, I'm Heidi and I homeschool my two sweet kids. I want them to know that learning is an exciting lifelong adventure! We love great books, unit studies, notebooking, lapbooking, and hands-on learning.