 Hi, I'm Heidi and I homeschool my two sweet kids. I want them to know that learning is an exciting lifelong adventure! We love great books, unit studies, notebooking, lapbooking, and hands-on learning.
Nature Study ~ Enjoying the Last Days of Summer in the Garden

The last Outdoor Hour Challenge from Barb at the Handbook of Nature Study blog for August was all about enjoying these last warm days in the garden. Barb loaded us up with ideas for spending a little extra time outdoors. It was wonderful because not only were the ideas easy to do, but they had us all noticing little details and soaking up the garden with all our senses.
My favorite activity was probably sitting quietly in the garden for five minutes. That’s an unusual activity for a family with young kids! I set us up on a blanket in the shade with our nature study clipboards and we recorded what we heard and saw. 
We also brought a couple flowers inside and the kids drew them for their nature journal…and like Barb suggested they drew them BIG. I love having the kids draw things they see–it really slows them down and they notice details.

We did all the activities on the August Grid over the course of the week. The weather was beautiful, and we soaked it up. It’s good for those of us in Maine to try and store up as many summer memories as we can: our seasons are already preparing to change. You can feel the difference in the air at night, and many of my garden flowers are rapidly declining. It’s all good because fall is my absolute favorite season: crisp air, picking apples and pumpkins, jumping in piles of leaves! I’m not going to think right now about January, February, March…winter is long here but I’m enjoying the rest of summer right now. Barb posted another grid from her archives–it’s loaded with ideas and we want to accomplish them all!
I’ll be submitting this to Barb’s Outdoor Hour Challenge Blog Carnival.

A Day in Our Home Schoolroom

This year I’m homeschooling a first and a fourth grader. I have a little more experience under my belt and am feeling a little more confident (read: not completely terrified and overwhelmed). I find myself more and more in love with Charlotte Mason’s philosophies, but still borrowing Classical and interest-led ideas. I have settled on the amount of structure that works for us at this stage. If you’re interested you can read my post on homeschool scheduling for more on how I went from small 15-minute blocks on a spreadsheet to the schedule we use now: all our weekly goals in a list with the ability to work through them in a flexible way. I don’t have specific times on our schedule, but focus more on getting things accomplished: if math takes 15 minutes or 45, we go with it. And now, on with our day!
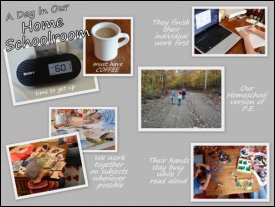
Wake Up:
Promptly at 6:01 my early-rising son comes into our bed. He has undoubtedly been awake for quite some time waiting for his clock to say 6:00. As soon as I can muster myself we head downstairs. He heads straight for Legos, I head straight for coffee. I feed Martha, our dog who won’t give anyone peace until she’s eaten. I am able to spend some time working: paperwork, planning, paying bills, emails, writing blog posts…
When I’ve had sufficient coffee to face the world I head out to walk Martha. We both come back ready to get rolling–me on to our school day, and Martha to flop down wherever we are and snore.

Breakfast and News:
When I return it’s time for breakfast (Dad joins us if possible). While we eat we watch CNN Student News. This is a great 10-minute news update meant for middle school to high school students, but I watch with them and I’ve only had to filter a story too old for them a couple times in over a year. We pause to explain or discuss and pull out maps to locate story areas. It makes for a lively and educational breakfast.
We clean up from breakfast and I head up to shower. The kids get ready, tidy their rooms, and complete a household chore (unload dishwasher, take out recycling). When we’re all ready it’s time for school!
Morning Meeting:
We tried variations of school morning meetings last year and they just didn’t work. Calendar activities didn’t feel like a good fit for both their ages, and I felt too repetitive and scripted. I felt we still needed some official start to our day and settled on my plan after reading a post from Barb at Harmony Art Mom on her morning routine. First we’ll have a devotion, and for that I chose The Story for Kids: Discovering the Bible from Beginning to End. I am excited to go through it with them and give them a chronological overview of the Bible’s story and message. After Bible time we’ll read poetry. Nothing fancy, just reading from anthologies we own or borrow from the library. My larger plan: they’ll memorize one poem each month, so as we’re reading they can choose their favorites for memorizing.
Individual Work:
Then it’s on to individual work! My daughter works from her weekly assignment sheet while I start with her younger brother and his reading program, as this requires the most concentration from him. I give little brother frequent changes–something requiring more concentration, then a mental break. Sometimes I’ll give him a full break to go play for a while, but often I allow him to choose from activity cards I made him last year. This was after I realized having worksheet-type activities for him didn’t suit his learning style.

The cards simply have pictures of educational activities he can do independently. I made two sets, a red set with language arts activities and a blue set with math and science activities. During his break or card activities I work with his big sister. Writeshop and All About Spelling require one-on-one time, for other subjects I can be available to help her get set up or for questions.
Snack and Read Aloud:
After an hour or so we’ll break for a snack and read aloud time. This is a great time for books that I need them to be looking at while I read. Sometimes the choices are just for fun, but often we have books that go with our history, fine arts, nature or science studies.
After snack it’s either back to finish individual work, or starting the subjects we do together until lunch time.
Learning at Lunch:
I try to use lunch time wisely, too: we might watch an educational video or listen to an audiobook, maybe even play a game. After everyone has eaten we head outside. Some days I head out with them because I have some nature study in mind (or just need to pull a few weeds), other days I send them out to burn off some energy and enjoy nature.
Working Together:
Then it’s back inside to work together on subjects. What do we do together? As much as possible! Here’s a sort of “master list” of things that might be on my weekly planning sheet for us to work on together (click over to our curriculum for specifics):
- Science
- History
- Read Aloud: during chapter books I allow them to keep their hands busy–building Legos, knitting, drawing
- Nature Study: using Barb’s Handbook of Nature Study Blog, often involves notebooking afterward for our nature journal
- Fine Arts (using Harmony Fine Arts grade 1 Overview year–new to us and we’re very excited)
- Art: projects for fun or that go along with Harmony Fine Arts
- Handicrafts: we cook, sew, and craft whenever possible!
- Journals
- Unit studies: we’ve done units based on literature, holidays, geography, history and science
Quiet Time:
We usually wrap up by early afternoon, though often reading aloud will happen again later in the day. One thing we try to make time for every afternoon is quiet time. I was persuaded to implement this after reading about it from Tricia at Hodgepodge. We do it a little differently but it really has been wonderful. When I call for quiet time the kids gather what they need–choices are to read (including looking at books and listening to audio books for my son), write, or draw. They set themselves up wherever they would like (the current favorite chairs are pictured below) and I set a timer for one hour. During that time they need to stay put and stay quiet. We started quiet time this summer and it is a great time for all of us to recharge. Everyone comes out of quiet time refreshed and I find the rest of our day and evening are more pleasant when we’ve made time for being quiet.

So there you have our typical “at home” day. I can be a bit uptight but am slowly learning to embrace flexibility to enjoy homeschooling. Of course like many homeschoolers we’re also involved in many outside-the-home activities: Boy scouts, Girl Scouts, piano lessons and youth group for my daughter, and gatherings with homeschool groups. We meet once a week with friends for a homeschool book club, and once or twice a month with a larger group for field trips and special events that give our kids a chance to practice public speaking, or are just for fun! I also prioritize family time–I don’t hesitate to throw out our “typical” day and take a hike, go pick apples, drive to see a lighthouse, or anything that we’re going to remember for years to come.
Thanks for joining me for a day in our home schoolroom. Be sure to check out what a day is like for other homeschoolers at iHomeschool Network’s Not Back to School Blog Hop.
Our Homeschool Journal: Gearing Up and Cleaning Out
We’ve had a productive two weeks: lots of summer fun, a good dose of schoolwork, painting and organizing in the schoolroom, and a major clean-out of our entire house. I’m tired just typing the things we’ve been doing, but it will be worth it when we’re relaxing on a camping trip next week. Then after that we’re back to full time school!
In our homeschool this week…(and last week since I didn’t post a journal entry then…)

We learned about granite and igneous rocks. Nature study is so enjoyable, and the ideas from Barb’s Handbook of Nature Study blog are so easy to implement, that we rarely skip this in our schedule. This Outdoor Hour Challenge came at a great time because we had recently hiked to a granite quarry after visiting a fort built with granite from that quarry. We got a chance to use our stereoscope, and decided it made the granite look like the surface of some strange planet! Notice the differences in the notebooking pages: My 6-year-old picked plain paper and drew pictures (including volcanoes), my 10-year-old chose a more structured page (a freebie from Barb). That’s the flexibility I love about notebooking!

We’re having a lot of fun in history, and have spent quite a while on Lewis and Clark. We finished up this week by exploring our backyard in their style–drawing all we found in our field journal and having snacks at camp. Our helpful dog came along just like Lewis’ dog (we really enjoyed the book Seaman’s Journal: On the Trail with Lewis and Clark).
Places we went and people we saw…
We visited a lot with friends, especially those who are heading back to school next week. We picked blackberries and made jam–not my favorite project, but opening a jar of summer in January is worth it!
My favorite thing this week was…
I was so happy to finish painting the set of lockers and moving them into the schoolroom. It meant I could finally put the room back together, and I just love how they turned out!

Here’s the link to our home schoolroom post if you want to check out the rest of the room!
My favorite resource this week…
The book All Through The Ages. I just know I’ll be using this guide to teaching history through living books for the rest of our homeschooling years. You can read my full review of All Through The Ages here.
What’s working for us…
Much of our time has been spent in a whole-house purge and it feels terrific! I realized that I feel less overwhelmed if the house is tidy, and that less stuff makes it easier to keep things tidy. I was able to persuade the kids to jump on board with getting rid of a lot by offering to have a garage sale and letting them keep the money for things they sell.
Things I’m working on…
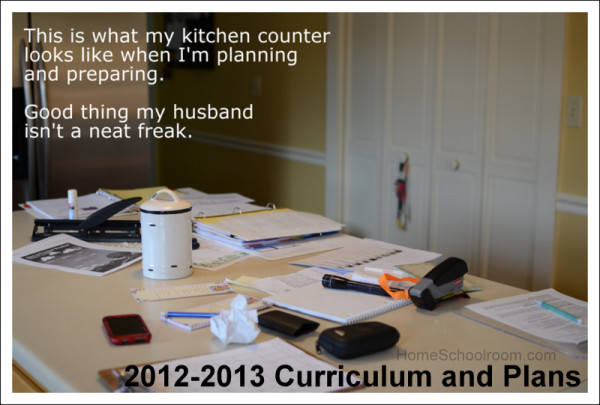
I’m getting our weekly lesson plans ready for starting our full-time school year after Labor Day. The new addition this year is an assignment form I made for my daughter. I wrote a post about how I tackle the paperwork side of homeschool planning.
I’m reading…
We finished Farmer Boy (loved it) and have moved on in the series. We’re listening to the audiobook for Little House on the Prairie and really enjoying the talents of Cherry Jones and the fiddle music! My daughter is reading Harriet the Spy by Louise Fitzhugh. I’m reading Beyond Survival: A Guide to Abundant-Life Homeschooling by Diana Waring–I’ve just started it so I can’t give an opinion on it just yet.
I’m grateful for…
My kids not heading back to public school full time in five days. We love enjoying fall together.
Thank you to the wonderful hostesses with fun link-ups on Fridays. Be sure to join the fun and see what other homeschoolers are up to!

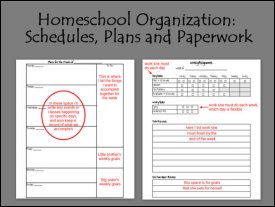
Homeschool Organization: Schedules, Plans and Paperwork…Oh My!
 I’ve said it before and I’ll admit it again…I love lists! They make me feel organized and productive. Lists and schedules were one way I calmed my fears as we began homeschooling. I started with a detailed spreadsheet for each week, with time slots in fifteen minute increments, including a little “M” indicating who I would be working with in every block. I know, many of you are chuckling. Go ahead! I can laugh now, too.

The problem was that instead of the schedule working for me, I was a slave to my schedule (dragging the kids along with me). I relaxed a little at a time until I found the level of organization that worked for me–enough to keep us on track but allow flexibility. Here’s a rundown of what I use now for planning and scheduling:
Monthly Calendars:
For our family my husband and I use Google Calendar. Yes, I fought changing to a computer-based calendar like I fight all new technology, and now I love it. We both stay up to date, and calendar alerts on my phone have saved me numerous times. Scheduled events like field trips, group meetings and classes go in Google Calendar–basically anything that requires us leaving the house.
For homeschool planning I use printable monthly calendars from Donna Young (a terrific site with loads of free resources). It’s a good place to organize my thoughts, and obviously I would clutter up Google Calendar if I added everything we do at home. Here I plan out our general school schedule: which weeks will be full time, part time or off. I write in public school schedules so we know when some of our friends are out of school. I also pencil in things like unit studies (elections/government in the fall, Christmas-related in December…) or special events we may want to celebrate or learn about.
Weekly planners:
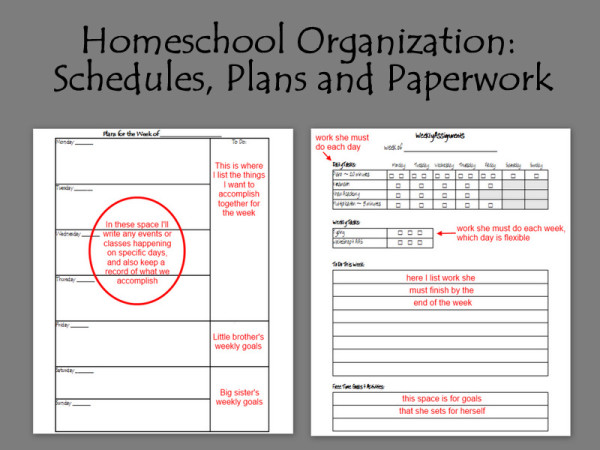
I use two weekly planners: one for me, and one for my daughter (age 10). I made these myself in a spreadsheet program (because I already knew how to use it), and they aren’t beautiful, professional-looking forms but they are easy for me to tweak and make changes to as needed.
This is my weekly planner, and you can see I’ve relaxed quite a bit since the tiny boxes with a little “M.” I ended up with my own variation of a weekly planner from Home School Mom (scroll down to “Weekly Planner with To Do List”) with a couple changes: I plan my weeks Monday-Sunday since I usually pull things together for the week on Sunday afternoon, and I divided the “To Do” box so I would have a large area for the work we do together, and a small area for each child.

What I like best about this is the flexibility–I can still make my lists and check things off, but we can work through the weekly goals in a flexible manner. We can spend extra time reading aloud if we can’t wait to see what happens next, delve into nature study if the weather is beautiful, or break out the paint or science experiments if I don’t need to worry about the mess that day. Not only that, but it gives me permission to be flexible for the fun things (“Hey kids, Dad wants to take us out to breakfast!”) and the not-so-fun (someone just threw up) without having to scribble all over my lesson plans and schedules.
This year my daughter has her own weekly assignment sheet. Last year I began making her a handwritten list of her independent work each day so she didn’t have to ask what to do next. She enjoyed seeing what she had to do, being able to cross things off (that’s my girl!) and the independence of choosing the order of her work. For part-time summer schoolwork I made her a list for the week instead of the day and it worked even better! It saved me time (hooray!), and if something needed to carry over I didn’t have to rewrite it each day. Subjects like typing could have three check boxes, and she could decide which days to do it. I made her a printable one this year to save time and keep it neat and organized. Repeating subjects are filled in, with room to write assignments like copywork or notebooking. Note that only her individual work is there; combined subjects like science and history are not on her assignment sheet.

Do you notice the area at the bottom–free time goals and activities? I am excited about this one. My daughter has lots of hobbies (sewing, knitting, writing stories and piano songs), but still sometimes needs help finding things to do on her own when I’m not directing her activities. I made this area for her to do her own list-making, hoping it will help her focus so her free time can be productive.
So there you have it, my scheduling and planning paperwork in a nutshell. Now if only I could organize all the other papers that pile up in our schoolroom…
Review: All Through The Ages, A Guide to Learning History Through Literature

I received a copy of the book All Through The Ages by Christine Miller from Nothing New Press for review. All Through The Ages is a guide to over 7000 books–quality “living books” that can be used for teaching history through literature. I’m wondering if this may possibly be the most glowing review I’ll ever write, because this resource just became my new best friend. I’d sleep with it under my pillow if it wasn’t so thick.
I’ll preface this review by saying that I’m becoming a bit of a history nut now that I’m a homeschooler. I barely remember anything from my history classes in school, except complaining that I couldn’t remember dates and names very well. Fast forward 15 years and for our first summer homeschooling I chose a unit study on the Revolutionary War from Homeschool Share. I found myself fascinated as we read books together. History was a great story! From then on I was hooked on learning history through good literature (with me learning right along with my children), then following up with narration (through notebooking or minibooks) and hands-on activities to cement those fascinating stories.
What is it?
All Through The Ages was written to fill a need that the author recognized: a one-stop resource for teaching history through literature. It contains books from over 20 respected sources: companies such as Beautiful Feet and Sonlight, books such as Honey for a Child’s Heart, award lists such as Newbery & Pulitzer (visit the website for a list of sources). Before finding this book I would check several book lists when planning our history studies, trying to sort out which books would be appropriate for my children’s ages for both reading aloud and as independent reading. I felt disorganized and had a hard time keeping track of which lists I had checked, and realized I would have to repeat the process when we studied these time periods again.
Right now we are studying the early 1800’s using a Time Traveler’s unit from Homeschool in the Woods. I love the written work and activities but wanted more than the lesson text for reading aloud. I was immediately able to try out All Through The Ages. I read the introduction, which is a great overview of the book and how it’s arranged, the author’s thoughts on studying history chronologically and using “living” books, and several examples of sequences for study. After that I went right to the time period we are studying.
What works for us:
In one place were recommended books on all the topics we’ll be studying! It’s not just the titles and author, but also a short note for each: the specific event or dates, for biographies a quick reminder of what that person did, and extra information like that the book is beautifully illustrated or contains authentic journal excerpts. The books are also divided into age groups (Grades 1-3, 4-6, 7-9, 10-12) and types (Resources for all Ages, Overview of the Era, Specific Events, Biography, Historical Fiction, Literature, Culture).

The book lists alone would make this a recommended resource, but I’m not done listing the wonders of this book yet. There is also a short write-up at the beginning of each section and a timeline of the era at the end–helpful for reminders and ideas of events to cover. In addition to sections on historical eras from Creation to modern times, there are sections covering the history of geographical regions, and also the history of science and math, visual arts and music. I can only imagine how often I’ll be using this book!
What doesn’t work for us:
For our homeschool this is an incredibly helpful resource without a single drawback. I do want to note that this is a Christian, Creation-based history resource. The author summarizes it this way:
I have chosen to use biblical chronology and the historical records of the ancient world, rather than, as most modern history references do, dates harmonized with current evolutionary theory.
Books from Answers in Genesis are included, and the ancient history timelines were aligned with James Ussher’s The Annals of the World (originally published in 1658).
The bottom line:
If you use a living books approach to studying history this is an invaluable reference book. It is well-organized, easy to use, and saves time. We love hands-on activities, lapbooking and notebooking so we use other resources as well, but with this book and a library card you could have a complete history program for a student’s entire homeschool career.
Check it out for yourself:
Nothing New Press has sample pages and the table of contents for you to view on their website, and you can purchase the book in print or as an ebook directly from them. The print book is also available from Rainbow Resources.
Nature Study ~ Saying Goodbye to Our Monarch Butterflies
Watching the metamorphosis of a caterpillar into a Monarch butterfly first hand was the highlight of this summer’s nature study. I wrote about finding Monarch caterpillars and observing them form a chrysalis a couple weeks ago. We watched the jewel-like chrysalis and patiently waited. Finally one morning the first chrysalis looked dark, and if you looked closely you could see the beautiful orange and black wing pattern!

We were so excited and began watching, hoping to see it emerge. I had read they usually emerge mid-morning so we tried taking turns watching and I set my camera up for time lapse photography. We watched all morning and my camera took photos until the battery died…no butterfly. No one was watching when he finally emerged after lunch. This was the same caterpillar (“Big Guy”) who formed a chrysalis when no one was watching, too, so perhaps he’s shy!
Two days later it was Little Guy’s turn. The morning that we could see his black and orange pattern we were set to leave for a day trip, so I prepared the kids that we would miss his emergence, too. We were bustling around getting ready and I happened to peak in and could see a crack forming in the chrysalis! I yelled to everyone (causing the dog to bark wildly) and all four of us watched in awe as he emerged.

“I love you!” whispered my ten-year-old daughter, as if to a newborn baby.
“This is the most exciting thing of my life!” exclaimed my six-year-old.
Watching the emergence was amazing, especially how the body of the caterpillar was plump and the wings appeared small and shriveled. I had read that they need to pump blood into their wings, but hadn’t thought of where the blood would come from! We watched the body grow smaller as the beautiful wings expanded.
We had enough time to take in every detail of these beautiful creatures. We were reminded of things we’d learned during our nature study: we caught a few glimpses of the amazingly long proboscis, we noted the brightly colored surface of the wings when open, but the paler color of the underside when closed, we counted the four longer legs but looked closely for the two smaller legs near the mouth. The awe and wonder of a plump striped caterpillar forming a jewel-like chrysalis that appears to be adorned with gold, only to emerge 10 days later as this lovely fluttering butterfly!


We released both of the butterflies on the same day that they emerged, back into the lovely wildflower field we had found them in as tiny caterpillars. Off they fluttered as we said goodbye. We all hoped they were the generation of Monarch butterflies that gets to go to Mexico for the winter!

My kids turned to me and said, “We’re going to do this again next year, right?”
Absolutely!
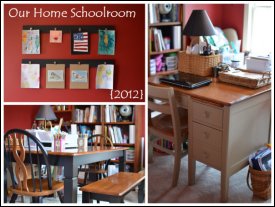
Our Home Schoolroom 2012
It’s about time I posted about our schoolroom here on Home Schoolroom!

We have a formal dining room in our home…and we aren’t formal dining kind of people. After it sat unused for a couple years, I turned it into my office and crafty space and painted it a deep red. I’d always wanted a red room! It was great because we could work on projects and leave them out. Then we decided to homeschool so now it’s still my office and a crafty space, but it’s also where most of our school supplies reside.
First let me say that not only are we fortunate to have a whole room to use, but that we’ve been very fortunate in finding some or our schoolroom items. I found free or very low cost items when a University was selling old furniture and when there was a sale at an area school when they were moving to a new building. I just had to keep my eyes open and be willing to do a little work to fix up the pieces! I also made a few items and used things we already had to complete our home schoolroom without spending a lot of money. Anyway, on to our room…
In the middle of the room you’ll find our work surfaces. This is my desk. (A lucky find for $15.)

The basket lamp is great for hiding some of my desktop clutter. The shallow basket is a good place to pile my papers that I plan to deal with soon. (Note to self: Deal with the papers in it soon.) There are also baskets on the floor on each side of my desk: one for yet more papers-I-plan-to-deal-with, the other for small sewing and knitting projects. Baskets are a necessity, they make my messes look nice.
This is the schoolroom table (our old dining table) where my children have their own workspace at each end.

At their workspaces are a wooden organizer and plastic drawer unit, both from Target, to hold pens, pencils, glue runners, a pencil sharpener and anything else to keep them from having to get up a dozen times when they’re working. They also have the 50-count pack of Crayola colored pencils. If you have the money in your homeschool budget I recommend upgrading to that pack. We use colored pencils a lot for lapbooking and notebooking and our nature journals. Having lots of colors to choose from is fun, and I find they work hard to look at the details to choose just the right color from all that variety. The organizers let them have the supplies they need, gives them a defined workspace, and still look cute!
The bench beside the table is perfect. If the three of us are working together on something we all sit there. I hope they’re never too big for that. (And that I’m not either!)

Tucked in between their spaces is my old laptop that they use for typing, Xtramath, Khan Academy and any educational computer games. We just slide it forward as needed.
Directly behind my desk is one of only two large wall spaces, and in a room this small we use every inch by going vertical!

The large magnetic board is used for All About Spelling. Finding a whiteboard that magnets stick strongly to in the size needed wasn’t cheap, so I made this one. It’s easy!
- I purchased a large black frame at AC Moore with a coupon for about $15.
- I had our local sheet metal fabricator cut a piece of galvanized steel to fit (he even let me pick the piece I wanted) for about $20.
- I removed the glass from the frame, slipped the steel in, and replaced the frame’s backing.
And for about $35 it was less than many of the large magnetic whiteboards I saw, and I love the way it looks!
Above that is an Advantus Grip-a-Strip display rail. I use it for maps, posters, timeline cards, art–you simply slip the item between the rails and rollers hold it in place; just push up and then pull down to remove it. The one complaint I have is that laminated items can slip out of the rollers. An easy solution I figured out: place a piece of blue painter’s tape on the top of the item. It doesn’t show but keeps the item from slipping.
Above that is yet another great find from the school sale: a set of roll-up maps (for $5!). I had wanted roll-up maps since I saw them used by Tricia at Hodgepodge as window blinds. Since we’re limited in wall space I thought it was a great idea!

I am in love with these and can’t wait to put them to good use. It took us half a day and around $35 of supplies to mount them, but since they hang right behind my head we wanted to be sure they wouldn’t come crashing down on me.
The wall you see from our kitchen is the “art wall.”

The rails make it easy to change out the artwork, and they were simple and inexpensive to make:
- Paint two long boards
- Use Liquid Nails to glue on some clips
- Install picture hangers on the back of the board.
Voila! A perfect place to enjoy the kids’ art for a while before it goes into their binders. (And a good drying place for wet art so the cat can’t walk on it!)
Below the art wall is our writing center. I was excited to organize our materials into a writing center after reading through the WriteShop teacher’s manual. For us this area is actually a combination writing, notebooking & lapbooking center.
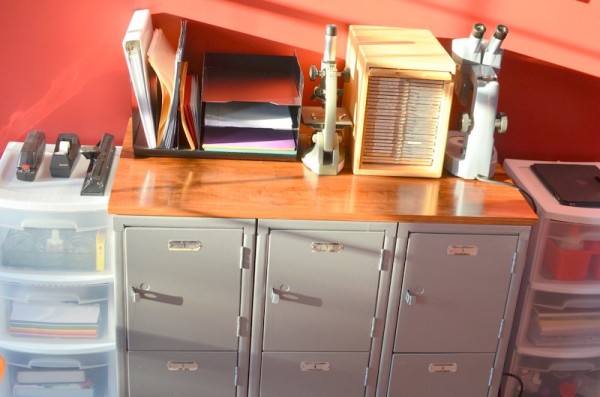
The base is my new favorite piece of furniture: a set of lockers I scored for $10 at the school sale! Some elbow grease and spray paint were all they needed to be the perfect storage piece for a home schoolroom. Beside them are plastic drawer units. (I’ve collected half a dozen over time and am always moving them around using them for different things).
Two lockers are reserved for my children as their writing cubbies. On top of the lockers is a desktop organizer for paper (lined, plain and colored), envelopes, file folders, sheet protectors, and a binder with notebooking pages to choose from. {Note: so far all my notebook pages have been free. Most are from The Notebooking Fairy, Homeschool Share, the Handbook of Nature Study Blog, and abcteach.} Other supplies in our writing/notebooking/lapbooking center are all sorts of paper (cardstock, printed scrapbook paper, stationery, specialty papers), papercrafting supplies (trimmers, fancy edge scissors, paper punches, adhesives, brads, stickers), a dictionary and thesaurus.
There are a few items in this section that are science related. (I had to overcome the organizer in me who really likes to stick with the theme.) One drawer holds experiment tools: goggles, beakers and test tubes–the stuff that helps us feel like real scientists. And on top of my lovely lockers sits two new-to-us very exciting items that we picked up at the school sale: a compound microscope (along with a wooden box to store slides) and a stereo microscope that will be helpful for examining interesting things we find.
On the opposite wall is a row of bookshelves (yup, all different sizes and wood finishes–use what you have).

In case you’re wondering, “Mr. Gooey” is a human body model with squishy organs, and “Mr. Bones” is a skeleton model that came with a book from Workman Publishing. Sorry I can’t give you an inexpensive source for the eye and ear: we got them for FREE at the school sale.
As you can see from my description of the schoolroom table, writing center and bookshelves I like giving the kids their own spaces: they like the ownership, and it’s nice to call for a “cubby clean-out” and have them be responsible for their areas.
This last photo shows the home part of the schoolroom: our dog’s bed, our cat’s cube, and a big comfy rocking chair.

The rocking chair was the one I rocked my babies in and now makes a great quiet corner to read. I can even still squeeze in with one child to work on something together. In small jars on the windowsill beside the rocker is our collection of sea glass from our ocean-side camping trips. On the wall between the windows is an antique printer’s tray that with a very special collection of heart shaped rocks that we’ve gathered for years. These are the items that bring the love of our family into our schoolroom.
Of course our “school” items spill over into the house. Nature field guides and binoculars are in the living room, a large hutch in the hallway holds the messier art supplies and educational games, and chapter books are in a bookcase outside our bedrooms. A lot of schoolwork takes place outside of this defined room: reading on a blanket on the lawn or cozy next to the fire, nature journaling on a walk in the woods, science experiments and art projects on the kitchen island…learning can happen anywhere!
I’m linking up over at iHomeschool Network’s Not Back to School Blog Hop. Click over to check out other schoolrooms!

Our Homeschool Journal: Lucky Finds
In our homeschool this week…
I didn’t get much that I had planned accomplished this week, but it was mostly due to some great luck. We acquired some amazing things for our homeschool this week for very little money. That’s the luck part. The only not-so-lucky part: our schoolroom now looks like a tornado hit…and spread debris throughout the whole house. I’m not complaining, though, because these items (some of which were on my wish list, some of which I didn’t even know I wanted!) are now ours:

- Snapshots Across America: a game I’d had on my Amazon wishlist since a friend told me about it. Learning about U.S. geography and famous places with a game? Perfect. Finding it at Goodwill for $1.00? Lucky. The only thing it was missing was directions, and after I emailed the company, Talicor, they kindly emailed them to me.
- Focus on the Family Radio Theatre of the complete Chronicles of Narnia: basically free. No, don’t hate me. Our library has an amazing summer reading program where the kids earn book bucks to “spend” at a celebration at the end of the program. I easily persuaded my daughter to have this be one of her choices.
- Microscope and a box of slides: a town in our area built a brand new high school and had a yard sale at the old one. It was great fun–they’d walk you through the old building and you could just make offers on anything not nailed down: we scored these for $20.
- Roll-down maps: this was the item I was actually hoping to find. After seeing how Tricia at Hodgepodge used them as window blinds I really wanted roll-down maps. We don’t have much wall space left in our schoolroom so it was the perfect solution. I saw these on a wall in one of the classrooms, and they were mine for $5.00. Seriously! Never mind it took us half a day and around $30 to hang them–it is still an amazing find.
- Lockers: who knew I needed these? For $10 these are going to be a fun addition to our schoolroom. I had to make some major furniture adjustments to accommodate these, but I just couldn’t pass them up.
Places we went and people we saw…
We did do some of what I planned–the first was attending an airshow at Owl’s Head Transportation Museum.

That same day we also checked another Maine lighthouse off our list!

And said goodbye to some little friends we’d become pretty attached to (full post on the Monarch butterflies later).

Things I’m working on…
So my almost-ready-for-the-new-school-year schoolroom is now completely torn apart. But it will all be worth it. I’m telling myself that as I am doing this:

I’m grateful for…
My husband. I was feeling overwhelmed, partly because my priorities were getting out of order. We went for a walk and I blabbered on and on and he kindly and gently reminded me of what mattered most and how much he valued my role in our family. After his pep talk I felt completely renewed. He is an amazing man, and I don’t know what I would do without him.
Thank you to the wonderful hostesses with fun link-ups on Fridays. Be sure to join the fun and see what other homeschoolers are up to!
2012-2013 ~ Curriculum and Plans
Well, here they are–my plans, dreams, and aspirations for the upcoming school year. And even though I love lists, I do try to make them in pencil and reserve the right to change them as needed!
Big Sister’s Fourth Grade Individual Work:
- WriteShop Junior D: This is a new curriculum for her and I’m very hopeful that it will be a great fit. She’s excited because it’s writing, an activity she loves, and that we’ll be working one-on-one for the lessons. There are three main goals I have for her with this program: a better understanding of paragraph structure, being able make an outline to organize her thoughts before she writes, and working on grammar within her own writing.
- All About Spelling: This curriculum was one of the hits from last year, though I would say we didn’t utilize it frequently enough to attain the full benefit. I started at level one as the program recommends and she could have gone through it much more quickly if we’d used it as often as recommended. We both liked it, though, and we’ll be diving in this year. I am planning to combine this with our work in WriteShop and block out a chunk of one-on-one language arts teaching time with her three times a week. With a year of experience under my belt and a more independent younger brother I think I can make this happen.
- Cursive Handwriting: She is capable of writing legibly in cursive, the goal now is to smooth it out and increase her speed so she can fully transition. She will be doing copywork in cursive that goes along with our history program, and I will also make more as needed using excerpts from literature we are reading and a free front called School Script Dashed.
- Math: We will continue to use Khan Academy as her math curriculum. I wanted to be sure it was the right choice for us so I did quite a bit of research over the last month. I was sure I wanted a computer-based curriculum that did not require me to plan and teach a lesson each day. After looking at all the option Khan still came out ahead for us–with the added bonus that it’s free. She enjoys the program, and with me or my husband nearby to help with any questions it works well for us. I keep an eye on the mathematics requirements in our local public school district, the Common Core standards, and Home Learning Year By Year by Rebecca Rupp to be sure she covers all necessary topics. We’ll continue to cement all math facts using XtraMath and I also have her play math apps for 10 minutes each day to work on multiplication facts. Edited to add: Okay, so plan A for math did not work at all. Short Story: we switched to Teaching Textbooks. Long story can be found in this post: Our Switch to Teaching Textbooks.
- Music: She continues in private piano lessons each week with a minimum of 30 minutes daily practice.
- Typing: She will use TypingWeb, a free web-based typing program to further her typing skills. The goal? That she can type her own stories since she can write fairly long ones!
Little Brother’s First Grade Individual Work:
- Funnix: Funnix is a computer-based learn-to-read program that is working very well for him, and I am very proud of our beginning reader! He will continue to progress through the lessons and on days we don’t do a lesson from Funnix I have him read from any beginning reader book he can tackle. Handwriting and spelling are all included in the lessons.
- Math: This was a tough subject to plan. He does not do well with a worksheet-based curriculum, which we tried last year, nor is he old enough for computer-based programs. I will use the same references I use for his big sister to determine the topics he needs to learn and we’ll tackle one skill at a time, approaching each topic in a way that suits him. It may be a hands-on game, it may be an iPad app, it may be cooking or building…this isn’t necessarily the easiest route but it’s what works best for him. (For more on this you can read my post about teaching coin recognition.)
Together Studies:
- History: We started work on Time Travelers Early 19th Century from Homeschool in the Woods. The printables (minibooks, notebooking, maps) and activities are terrific. We’ll spread this history unit study over the first half of the school year, reading lots of living books and finding documentaries to supplement.
- Science: We also started a science curriculum this summer–R.E.A.L. Science Odyssey Life Level One. It is also working well and we will continue into the school year. You can read my full review of R.S.O. We’re working on the animal kingdom now, then we’ll be slowing down as we get to the human body and really diving into that topic. I had been preparing a human body unit study (due to great interest from my son) before I received this curriculum so we’ll use R.S.O. along with other materials I’d gathered.
- Nature Study: One of the most enjoyable parts of our homeschool. We use ideas from Barb at the Handbook of Nature Study, participate in her Outdoor Hour Challenges, and also follow any interest-led nature study topics.
- Unit Studies: We will fit in unit studies as we go along based on holidays, special events (like a presidential election) and interest. I know that I want to do one on government and elections in October, and we take a break from most of our regular schoolwork in December to focus on Christmas topics.
- Other Activities: both children participate in Scouts, we will now have weekly meetings with our homeschool bookclub that met once a month last year, and big sister is in a youth group at church.
Well, it sounds like we’ll have plenty to keep us busy! The funny part is, I keep trying to plan more. I would like to incorporate composer and artist studies and am considering Harmony Fine Arts plans. I also would like to dabble in some foreign language fun–nothing too expensive or time intensive just now. But I am going to let us get rolling into our year and be happy to add/subtract and make any adjustments as we go along.
I’m linking up at the iHomeschool Network’s Not Back to School Blog Hop. Pop over there to take a peek at other homeschoolers’ plans!
Review: R.E.A.L. Science Odyssey Life Level One

Though not everyone views a formal science curriculum as necessary for children in early elementary years, I have a six year old son who loves all things science. We already did a lot of reading science books and watching scientific shows, but I wanted to spend more time on science in our homeschool and be sure I was covering basic building blocks of science knowledge for both him and his 10-year-old sister. I was excited to receive a copy of R.E.A.L. Science Odyssey Life Level One curriculum from Pandia Press to review. I had seen this curriculum online and was interested in seeing if it would be a good fit for our family.
What is it?
R.E.A.L. Science Odyssey is a science curriculum from Pandia Press. R.E.A.L. stands for read, explore, absorb, and learn. Life Level One is a full year of life science designed for grades 1-4. Each unit consists of a read-aloud lesson page followed over the course of the week (or longer, if needed) by hands on activities and labs that reinforce that lesson. There are student pages for your children to record what they’ve observed and the results of lab activities.
What works for us:
- The text for the lesson is not like a dry textbook, but more like a fun conversation with your cool scientist neighbor. The lesson page is informative but short and interesting enough to hold even my six-year-old’s attention.
- As a fan of Charlotte Mason and lover of good books I really appreciate the list of additional reading suggestions. It is especially handy because it marks which books are highly recommended versus just “more fun than science.” I attempt to request most of these from our library and feel it is a good supplement to the lesson text pages in the curriculum.
- The best part of this curriculum, and the reason it’s a great fit for our family, are the hands-on activities. Very little time is spent with me just talking to my kids about science, much more time is spent showing and doing and trying. As a line in the curriculum’s introduction states: “If you hate to touch “bugs,” wouldn’t think about letting your child handle worms and have no intention of getting gooey and dirty, RUN NOW!” You’ll be asked to bring critters into your home, build models, act out life cycles, and test different functions of your body. Many of the activities are easy to implement and may seem simple, but doing things really cements knowledge for my children.
What doesn’t work for us:
- We don’t usually use worksheets, so some of the printed pages intended for the student to fill out don’t work well for us. I skip the pages that include coloring or labeling the parts of a existing drawing, or simply have fill-in-the-blank questions. Drawing encourages my children to look carefully and pay attention to details. Many pages do have the child make a drawing of an observation and I use those, or if I skipped the included worksheet I simply give my children a blank piece of paper. If I had to estimate I would say I’m able to use roughly 80% of the student pages. Having the building blocks of science covered and hands-on learning activities planned out for me far outweighs not liking some of the printables.

- There are hand-drawn illustrations, but no real photos. In many instances you’ll be going outside to look for worms or a flower instead of needing a picture, but there are many items we don’t have easy access to. Internet searches or additional books will fill in the gap.
- I had to rearrange the order of the lessons. If we had done them in order we would have labs requiring worms, butterflies or other creatures from outside when in Maine the outside is buried in snow. I was nervous about this since the introduction discussed how the curriculum was meant to be used from start to finish with concepts building on one another, but I found it fairly simple to rearrange. The units are laid out this way: an introduction to the basis of life, then a study of the human body, followed by a study of the animal kingdom and then the plant kingdom. We did the introduction and moved into the animal kingdom (the last phylum covered is mammals), then we’ll spend much of the winter on the human body, and finish up with the plant kingdom in the spring when we can actually find signs of life outside.
The bottom line:
If you’re looking for an elementary level science curriculum that involves a lot of hands-on learning R.E.A.L. Science Odyssey may work for you. My kids are learning a lot and enjoy the activities. It’s simple to implement with easy-to-understand text and clear instructions for all labs and activities. Suggestions for supplemental books and websites are already included. This is a secular science curriculum, but other than a list of books covering evolution in the additional reading suggestions I didn’t find topics in this curriculum that would cause problems for Christian homeschoolers.
Check it out for yourself!
Pandia Press shows several preview pages for RSO Life Level One on their website, and there is also a larger preview to download. You can purchase the ebook directly from Pandia Press, or they have a list of retailers that sell the print version. I received the ebook and found it quite easy to use, with the added benefit of being able to print a copy of the student pages for each of my children.
Hi, I'm Heidi and I homeschool my two sweet kids. I want them to know that learning is an exciting lifelong adventure! We love great books, unit studies, notebooking, lapbooking, and hands-on learning.